Orca Slicer Z Hop Types and Settings : A Complete Guide
Orca Slicer’s Z hop feature helps prevent your printer’s nozzle from dragging across already printed layers by lifting it slightly during travel moves. Using Z hop can reduce stringing and improve print quality by avoiding accidental contact with the model.
You can adjust the Z hop height and enable it for specific moves within Orca Slicer settings. This control lets you tailor the lift to your printer’s capabilities and the type of print you’re working on.
Understanding how to properly configure Z hop in Orca Slicer ensures smoother prints and less post-processing time. It’s a simple tweak that can make a noticeable difference in your 3D printing results.
Understanding Z Hop in Orca Slicer
Z Hop controls how your printer’s nozzle lifts during travel moves to avoid collisions and improve print quality. It adjusts the vertical movement between layers and affects both surface finish and print reliability.
Definition and Purpose of Z Hop
Z Hop is a setting that raises the nozzle on the Z-axis during non-print moves. Instead of staying at the same height, the nozzle lifts by a specified distance to prevent it from dragging across the printed part.
This helps reduce print defects like scratches, blobs, or layer shifts caused by nozzle contact with already printed sections. You define the Z Hop height as a parameter in Orca Slicer, typically in millimeters.
The primary purpose is to protect delicate features and ensure better print consistency, especially in prints with many travel moves across open areas or fine details.
How Z Hop Works in 3D Printing
When your printer completes a segment and needs to move to a new position without extruding, Z Hop activates by raising the nozzle vertically. The position shifts by the set amount, then travels horizontally, and finally lowers back to the printing layer height.
This process is automatic and integrated into your slicing instructions. You control the height and whether Z Hop is enabled or disabled on travel moves.
In Orca Slicer, you can adjust Z Hop under travel or layer movement settings. A typical value ranges from 0.2mm to 0.8mm, balancing clearance and minimal print time increase.
Benefits of Using Z Hop
Using Z Hop reduces nozzle collisions with the print surface when moving across gaps or raised sections. This lessens surface marks caused by nozzle dragging, preserving part aesthetics.
It also decreases the risk of dislodging or damaging fragile print features during travel moves. This is especially useful for complex or tall prints with thin walls or overhangs.
Another benefit is preventing nozzle clogs caused by filament build-up due to repeated scraping on printed areas. However, excessive Z Hop may slightly increase print times or introduce minor artifacts if set too high.
Adjusting Z Hop effectively enhances print quality and reliability without requiring hardware changes.
Orca Slicer Z Hop Types and Settings
Orca Slicer Z hop is a valuable feature designed to lift your printer’s nozzle during travel moves, helping avoid collisions with printed parts. This adjustment improves surface quality, reduces stringing, and protects delicate structures—especially in complex prints.
In this guide, we’ll explore the types of Z hop in Orca Slicer, how it compares with Z hop in Bambu Studio and PrusaSlicer, and how to fine-tune your Z hop height and Z offset for peak 3D printing performance.
What Is Z Hop and Why It Matters
Z hop is a travel feature in slicers like Orca, Bambu Studio, and PrusaSlicer. It slightly lifts the print head along the Z-axis during non-printing moves, avoiding contact with the already-printed model.
Without Z hop, the nozzle may drag, leaving scratches, blobs, or even causing layer shifts. Using the right Z hop type and height can significantly improve your print quality with minimal changes.
Understanding Orca Slicer Z Hop Types
Available Z Hop Types in Orca Slicer
Orca Slicer gives you flexible control over Z hop behaviors with multiple types or conditions under which Z hop is triggered:
- Z Hop When Retracted: The most common mode; lifts the nozzle during retraction moves.
- Only When Crossing Perimeters: Limits Z hop to travels that cross already printed lines.
- Z Hop on All Travels: Applies Z hop on every non-print move, regardless of position.
These Orca Slicer Z hop types help reduce unnecessary lifting while still preventing defects. For most users, enabling Z hop during retraction is enough, while crossing-perimeter mode adds extra protection for detailed prints.
Setting Up Z Hop in Orca Slicer
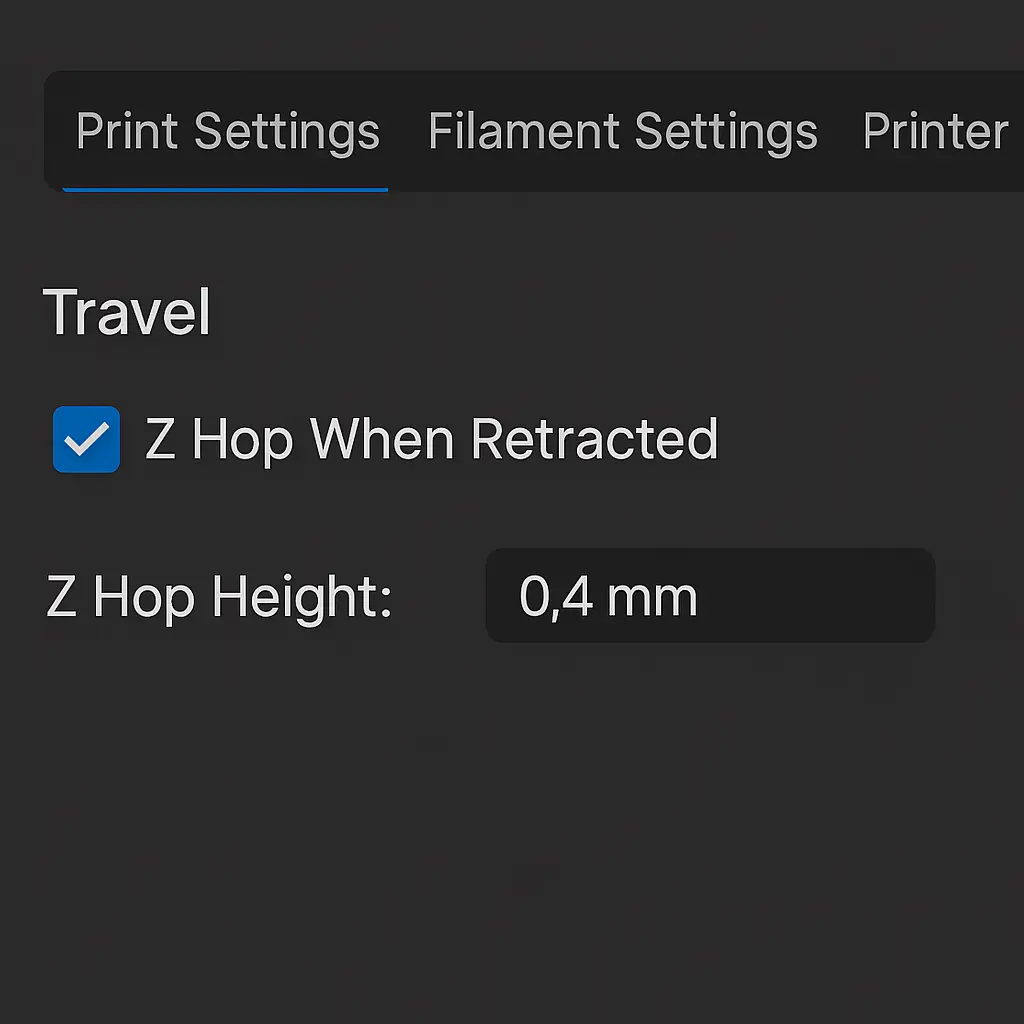
How to Enable or Disable Z Hop
To access Z hop settings:
- Open Orca Slicer.
- Go to the Print Settings tab.
- Navigate to Travel > Z Hop When Retracted.
- Check or uncheck the box to enable or disable Z hop.
To disable Z hop, simply uncheck the setting. You might do this when printing low-profile models or materials where stringing isn’t a concern.
Adjusting Z Hop Height and Z Offset
- Z Hop Height: This is how high the nozzle lifts during travel. Common values range from 0.2 mm to 0.8 mm.
- Orca Slicer Z Offset: This value offsets your Z axis to fine-tune the nozzle’s position relative to the print bed—important if Z hop causes slight layer misalignments or first-layer issues.
Start with a Z hop height of 0.4 mm for 0.2 mm layer heights and adjust in 0.1 mm increments. Adjust your Z offset if the nozzle is too close or too far from the print during initial layers.
Comparing Z Hop in Orca, Bambu Studio, and PrusaSlicer
Z Hop — PrusaSlicer
PrusaSlicer includes a simplified Z hop setting similar to Orca’s basic option. Its “Lift Z” function activates during retractions, with no conditional types like Orca’s perimeter crossing mode. It’s effective but less customizable.
Z-Hop Type Bambu: Adaptive Z Hop
Bambu Studio Z hop settings offer advanced behavior through “Z-hop type” selection. This slicer, designed for Bambu Lab printers, can automatically lift the nozzle based on material and travel path complexity. Key benefits include:
- Smart Z-hop: Dynamically lifts the nozzle only when needed.
- Manual Z-hop: Lets users specify lift heights manually.
- Avoidance-aware travel moves: Reduces unnecessary lifts by optimizing pathfinding.
This makes Z-hop type Bambu highly efficient for high-speed printing with reduced print time impact.
Why Prefer Orca Slicer for Z Hop?
- More Z hop types than PrusaSlicer.
- Greater manual control compared to Bambu’s mostly automated approach.
- Integrated Z offset tuning to fine-tune first layer and travel moves.
If you’re printing multi-part models or fragile geometries and need per-travel-type adjustments, Orca Slicer offers the most granularity.
Best Practices for Z Hop Optimization
Combine Z Hop with Retraction Settings
To get the best from Orca’s Z hop:
- Enable Z hop when retracted.
- Set retraction speed to 30–45 mm/s.
- Use a retraction distance suited to your filament (typically 4–6 mm for Bowden setups).
- Tune minimum travel distance before retracting to avoid over-retracting.
This setup prevents oozing and stringing, especially with sticky materials like PETG.
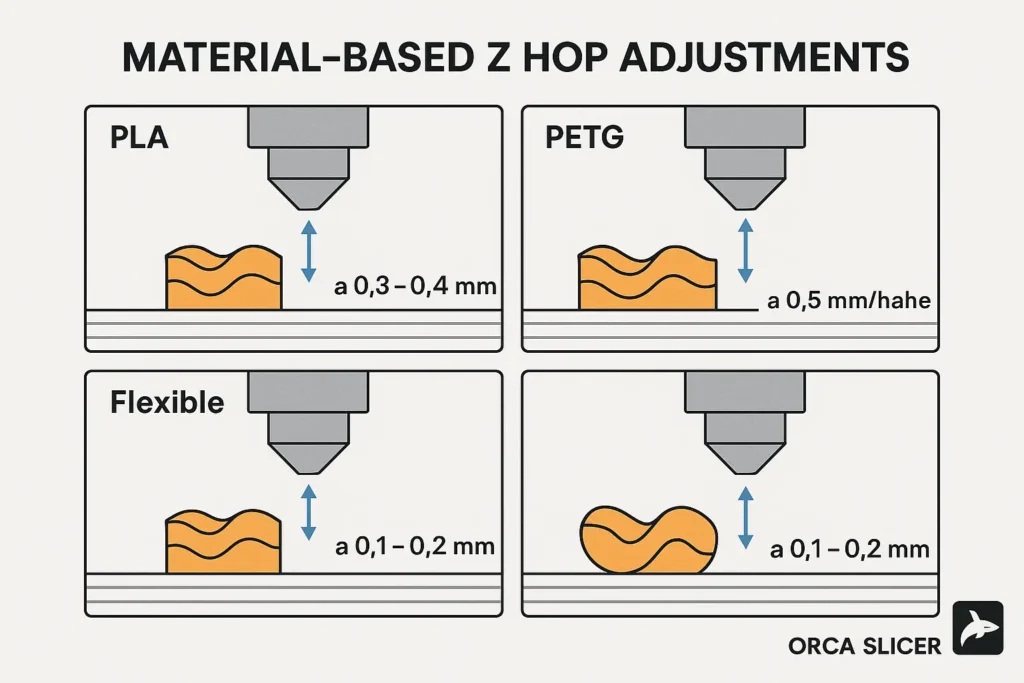
Material-Based Z Hop Adjustments
- PLA: 0.3–0.4 mm Z hop; moderate retraction.
- PETG: 0.5–0.8 mm Z hop; higher retraction to counter ooze.
- TPU (Flexible): 0.1–0.2 mm Z hop to reduce nozzle drag.
Always pair Z hop adjustments with Z offset testing to ensure the nozzle height is accurate at every layer.
Common Z Hop Issues and Fixes
1. Layer Misalignment
- Cause: Z hop height too high or inconsistent.
- Fix: Adjust in small increments and verify mechanical stability of your Z-axis.
2. Longer Print Time
- Cause: Overusing Z hop or using it on all travel moves.
- Fix: Switch to Z hop only when crossing perimeters or Z hop when retracted for optimal speed-quality balance.
Tuning Orca Slicer Z hop types correctly boosts your print reliability, especially when printing complex or delicate parts. When paired with accurate Z offset and retraction settings, you’ll reduce print flaws like stringing, blobs, or scratches.
For more automated Z hop behavior, explore Bambu Studio Z hop settings or Z hop — PrusaSlicer, but Orca remains the go-to for users needing precise, customized Z-axis control.
Configuring Z Hop Settings
Z Hop reduces the chance of your nozzle hitting printed parts during travel moves by lifting the nozzle. Correctly adjusting height and enabling options ensures cleaner prints and fewer nozzle collisions.
Accessing Z Hop Options in Orca Slicer
To find Z Hop settings, open Orca Slicer and navigate to the Print Settings tab. Under the Travel section, locate the Z Hop When Retracted setting.
Enabling this checkbox activates Z Hop. Here, you can adjust the Z Hop Height value, which controls how far the nozzle lifts during retraction travel.
You may also access finer controls related to Z Hop travel speed and retraction distance in nearby settings. Make sure your printer firmware supports Z Hop for it to function correctly.
Recommended Z Hop Height Values
A typical Z Hop height ranges between 0.2 mm and 2.0 mm depending on your layer height and print complexity.
For standard 0.2 mm layer printing, a Z Hop height of 0.4 mm to 0.6 mm usually prevents nozzle collisions without excessive travel time.
Prints with fragile or highly detailed features may require a higher Z Hop around 1.0 mm, while low-profile prints might need less or none.
Avoid setting the height too high, as it can increase print time and risk layer misalignment during the Z lift.
set_gcode_offset z 003 move 0 in Orca Slicer
The set_gcode_offset z 0.03 move 0 command is a useful G-code instruction used to fine-tune the first layer height in Orca Slicer. It allows users to temporarily adjust the Z-offset by 0.03 mm, raising or lowering the nozzle slightly depending on print adhesion and squish. This command is especially helpful when your first layer is too squished or too far from the bed, as it lets you test minor changes without needing to re-level the entire bed.
In Orca Slicer, you can use this command during live Z-offset calibration tests. By entering set_gcode_offset z 0.03 move 0 into the console or adding it in your print start G-code, you can make real-time tweaks and immediately observe the impact on layer adhesion. It’s a great method for dialing in that perfect first layer, especially when switching between filaments like PLA, PETG, or TPU that require slightly different Z offsets.
Orca Slicer Z Offset Calibration
Z-offset calibration in Orca Slicer is critical for ensuring optimal first layer adhesion and overall print quality. It refers to the process of setting how close or far the nozzle should be from the print bed at the start of a print. Orca Slicer offers built-in tools and macros to help you fine-tune this value precisely, and it’s especially helpful for those using PEI or textured build plates, where small differences can significantly impact adhesion.
To perform Z-offset calibration in Orca Slicer, you can use a test print such as a single-layer square or circle and adjust the Z offset in real-time using your printer’s interface or G-code commands. It’s advisable to make small incremental changes (±0.01–0.05 mm) while the print is running to find the sweet spot. A well-calibrated Z offset means smoother first layers, fewer adhesion issues, and less chance of filament dragging or under-extrusion.
Orca Slicer Z Offset Test
Testing your Z offset in Orca Slicer involves printing a simple shape — usually a single-layer square or a pattern grid — and adjusting the offset as the print starts. These tests help you determine whether the nozzle is too close to the bed (over-squished) or too far (poor adhesion). Ideally, the extruded filament should form a flat, even line that sticks well but doesn’t scrape the bed.
It’s best to conduct multiple tests with various materials, as each filament type reacts differently to Z height. For instance, PLA often requires a tighter first layer, while TPU may benefit from a slightly higher Z offset to avoid nozzle drag. Always start with the manufacturer’s recommended value, then adjust by 0.01–0.05 mm based on how the first layer looks. This testing process ensures consistent print success and avoids common issues like warping or nozzle clogs.
Orca Slicer Z Offset Not Working
If the Z offset in Orca Slicer is not working, it could be due to several causes: incorrect firmware settings, slicer overrides, or active Z-hop configurations interfering with calibration. One common issue is when users manually input a Z offset value, but the printer’s firmware or start G-code overrides it, effectively canceling the adjustment. Always check if there’s a conflicting command in your printer’s firmware or G-code script.
Another potential issue is a slicer misconfiguration, like setting Z offset in the slicer but also applying it in the printer firmware. Double adjustments can lead to unexpected nozzle positions. To fix this, ensure you’re only applying Z offset in one place and test using a basic print. Also, disable Z-hop (if active) during testing to prevent nozzle lifts that skew layer results. Proper troubleshooting helps isolate and fix the offset problem efficiently.
How to Disable Z Hop in Orca Slicer
Disabling Z-hop in Orca Slicer is straightforward and often recommended when troubleshooting first-layer issues or calibrating Z offset. Z-hop is a setting that lifts the nozzle by a few millimeters during travel moves to prevent nozzle collisions with printed parts. However, during Z offset tuning, Z-hop can interfere by lifting the nozzle between moves, which may give misleading results when judging first layer adhesion.
To disable Z-hop in Orca Slicer, go to the Print Settings > Travel section, and locate the “Lift Z” or “Z Hop When Retracted” option. Simply uncheck or set the value to 0 to deactivate it. Once disabled, the nozzle will move across the print bed without lifting, giving a more accurate representation of first-layer behavior. Remember to re-enable it later for prints with intricate top layers or when printing with delicate materials that may warp or string.
Enabling or Disabling Z Hop
You enable Z Hop by checking the Z Hop When Retracted box in the travel settings.
Disabling it is as simple as unchecking the same option, which might be preferable for prints where travel paths are short or nozzle contact is minimal.
Evaluate your print’s geometry and material; some filaments don’t benefit from Z Hop due to stringing issues caused by frequent lifting.
Test prints without Z Hop to compare quality and adjust accordingly for your specific print jobs.
Optimizing Print Quality with Z Hop
Z hop settings help control nozzle movement between print areas, reducing potential contact with the print surface. Adjusting these settings properly can prevent common print defects and control oozing, improving your overall print quality.
Reducing Print Defects and Artifacts
When your nozzle moves without Z hop, it can drag across the print, causing scratches or dislodging parts. Enabling Z hop lifts the nozzle by a small amount during travel moves to avoid contact.
Set your Z hop height to just enough distance, usually between 0.2 mm and 0.6 mm. Too high can cause longer print times or layer misalignment.
Use Z hop especially for prints with multiple small parts or delicate features. The lifted nozzle helps prevent blobs, scratches, and unwanted extrusion marks.
Managing Stringing and Oozing
Z hop can indirectly reduce stringing by minimizing nozzle travel near printed surfaces. When the nozzle lifts, it lowers the chance that oozed filament touches your model, which forms strings.
However, Z hop alone doesn’t stop oozing. Combine it with retraction settings: adjust retraction distance and speed for your filament type.
Experiment with the Z hop trigger height to activate lifting only when necessary. This prevents unnecessary nozzle movement, further controlling filament leakage.
Together, these steps help you manage stringing for cleaner, more precise prints.
Advanced Z Hop Techniques in Orca Slicer
Managing Z hop properly can prevent nozzle collisions and improve print quality. Adjusting Z hop in combination with retraction and tailoring it for specific materials are key strategies you can apply in Orca Slicer.
Combining Z Hop with Retraction Settings
You want to pair Z hop with precise retraction to avoid stringing and blobs. In Orca Slicer, increasing the retraction distance slightly when using Z hop can help reduce ooze during travel moves.
Set the retraction speed between 25-45 mm/s depending on your extruder type. Too fast can cause clogs; too slow may not prevent strings. Make small incremental adjustments after enabling Z hop height—usually between 0.2 mm to 0.5 mm is effective.
Also, monitor the minimum travel distance before retraction to reduce unnecessary retracts. Use Orca Slicer’s preview to check if combined settings reduce filament drips on non-print moves.
Material-Specific Z Hop Adjustments
Different filaments benefit from tailored Z hop settings in Orca Slicer. For PLA, a moderate Z hop height around 0.3-0.4 mm reduces marking on layers without slowing print speed too much.
When printing PETG, increase Z hop to 0.5 mm or higher because PETG tends to ooze more, helping avoid surface defects. You might also want to slightly increase the retraction length to complement this.
Flexible filaments like TPU require lower Z hop values, around 0.1-0.2 mm, to prevent the nozzle from dragging while maintaining print stability.
Adjust these settings based on your specific filament brand and printer for optimal results.
Troubleshooting Common Z Hop Issues
When adjusting Z hop settings in Orca Slicer, you must balance precision and movement to avoid print defects and inefficiencies. Incorrect configurations often lead to alignment problems and longer print times, which impact your overall print quality and workflow.
Layer Misalignment from Incorrect Z Hop
Layer misalignment often occurs when your Z hop height is too low or too high relative to nozzle clearance. If the Z hop doesn’t lift the nozzle enough to clear printed parts, it can cause the nozzle to drag, shifting layers sideways.
Another cause is inconsistent Z hop values during retractions, which may cause uneven layer placement and visible seams.
To fix this, verify your Z hop height matches the layer height and part features. Use small increments (0.1–0.2 mm) when adjusting. Check for mechanical issues like loose lead screws or belts that can worsen the misalignment despite correct settings.
Overuse of Z Hop and Print Time Impact
Setting your Z hop too high leads to unnecessary vertical movements. This lengthens print time because your printer spends extra cycles lifting and lowering the nozzle between moves.
Excessive Z hop also increases wear on your Z-axis components over time. It offers diminishing returns beyond a certain point and does not improve print quality further.
Optimize your Z hop by balancing lift distance and retraction speed. Use the smallest Z hop that prevents nozzle collisions without significant time penalties. Tracking time changes in your slicer preview can help you fine-tune these settings efficiently.
Comparing Z Hop Approaches Across Slicers
Z hop behavior varies notably between slicing software, affecting how your printer handles layer shifts and nozzle collisions. It’s crucial to understand these differences to choose the right settings and improve print quality.
Differences Between Orca Slicer and Other Popular Slicers
Orca Slicer lets you customize z hop height and trigger conditions precisely, with options to enable z hop only during travel moves that cross printed areas. Unlike some slicers, Orca calculates z hop dynamically based on layer and speed, improving reliability.
Popular slicers like Cura or PrusaSlicer offer simpler toggle-based z hop settings without conditional triggers. Cura’s z hop lifts the nozzle uniformly on all travel moves, which can increase print time unnecessarily.
PrusaSlicer allows z hop only when the nozzle crosses already printed sections but lacks Orca’s adaptive height adjustments.
When to Prefer Orca Slicer for Z Hop
You should prefer Orca Slicer if your prints often experience nozzle dragging or layer damage during travel moves. Its conditional z hop reduces unnecessary vertical movements, which helps keep print speed optimized.
Orca Slicer’s control over z hop height per layer and print feature is useful when working with delicate bridges or overhangs. It also offers more granular tuning, making it ideal for complex or multi-material prints requiring consistent surface quality.
If your priority is quick setup and less detailed control, other slicers might suffice. But for precise z hop management, Orca’s flexibility is advantageous.
Conclusion
Fine-tuning the Z offset in Orca Slicer is one of the most essential steps to achieving consistent first-layer quality and overall print success. Whether you’re adjusting it manually using set_gcode_offset z 0.03 move 0, running a calibration test, or troubleshooting issues where Z offset changes don’t seem to apply, mastering this function ensures your prints stick properly, don’t warp, and have smooth, reliable foundations. Every filament and build surface may require a slightly different offset, so don’t be afraid to experiment using test prints and live adjustments to find that perfect sweet spot.
On the other hand, understanding when and how to disable Z-hop is equally important. While Z-hop prevents nozzle collisions during complex prints, it can interfere with accurate Z offset calibration. Temporarily turning off Z-hop allows for more precise observations during the first-layer tuning process. Once your settings are dialed in, you can reactivate Z-hop for high-detail or sensitive prints. Together, proper Z offset calibration and smart use of Z-hop settings empower you to optimize print quality, reduce failures, and enhance your overall 3D printing experience with Orca Slicer.
Frequently Asked Questions
How do I disable Z Hop in Orca Slicer?
You can disable Z Hop in Orca Slicer by navigating to Print Settings > Travel > Lift Z and setting the value to 0.
Evidence: The “Lift Z” parameter controls the Z-axis lift during travel moves—this is what’s known as Z Hop. Setting it to 0 effectively disables the feature.
Outcome: Disabling Z Hop helps during initial layer calibration and reduces stringing or print head delays on simpler models.
What are the types of Z Hop in Orca Slicer?
Orca Slicer (based on Bambu Studio) typically uses a basic Z Hop triggered during travel moves over printed areas, but it also integrates smart Z Hop logic depending on nozzle lift clearance and print geometry.
Evidence: Advanced slicers like Orca use conditional logic to lift the nozzle only when needed, especially when retraction is enabled and traveling over existing structures.
Outcome: Smart Z Hop minimizes unnecessary travel height changes, leading to faster print times while avoiding nozzle drags.
Why isn’t my Z offset working in Orca Slicer?
Your Z offset might not work if overridden by the printer’s firmware, conflicting start G-code, or mesh bed leveling settings.
Evidence: On Reddit and forums, many users report that settings like set_gcode_offset z 0.03 move 0 are ignored unless no other leveling or compensation is active.
Outcome: To fix it, ensure no auto bed leveling resets the offset, and test using manual G-code commands or Orca’s Z-offset test pattern.
What is the difference between Z Hop and Z Offset?
Z Offset is a permanent vertical adjustment of the nozzle position relative to the build surface, while Z Hop is a temporary lift during travel moves.
Evidence: Z Offset is used to tune first layer height, whereas Z Hop prevents dragging the nozzle over printed areas during moves without extrusion.
Outcome: Using both correctly ensures a good first layer and prevents nozzle crashes or scratches during travel.
What are Bambu Studio Z Hop settings and types?
In Bambu Studio (and Orca Slicer), Z Hop is enabled under Travel > Lift Z, with options to set the hop height (e.g., 0.2mm) and enable it during retraction or travel over printed parts.
Evidence: The “Lift Z” height is fully customizable, and its application can be toggled to activate only under specific movement conditions.
Outcome: Customizing Z Hop types in Bambu Studio ensures better print quality with fewer blobs, zits, or nozzle strikes.
What is “Z Hop Type” in Bambu or Orca?
Z Hop types refer to when and why Z Hop is triggered—either always during travel moves or only over existing parts or per user-defined conditions.
Evidence: Bambu firmware and slicer tools like Orca allow for conditional Z Hop logic through G-code analysis and slicing heuristics.
Outcome: Choosing the right Z Hop type improves reliability on complex prints without sacrificing speed.
How is Z Hop handled in PrusaSlicer compared to Orca?
PrusaSlicer offers Z Hop with retraction and customizable values similar to Orca Slicer. However, Orca adds smarter logic from Bambu Studio integration.
Evidence: In PrusaSlicer, the Z Hop setting is found under Printer Settings > Extruder > Lift Z, while Orca blends slicer and printer-side intelligence.
Outcome: While both slicers handle Z Hop effectively, Orca often gives smoother results thanks to its fine-grained control and real-time preview features.
What’s the best way to test Z offset in Orca Slicer?
Use the “Z offset test” model provided by Orca Slicer, or manually run a test pattern while adjusting the Z offset live during printing.
Evidence: These patterns are designed to expose over- or under-extrusion due to incorrect Z offset, letting you dial in the perfect value.
Outcome: A well-tuned Z offset ensures the first layer is neither too squished nor too far, improving adhesion and visual quality.
Where to find Orca Slicer Z Hop discussions on Reddit?
Subreddits like r/BambuLab, r/3Dprinting, and r/OrcaSlicer regularly feature community experiences and troubleshooting tips for Z Hop and travel settings.
Evidence: Posts discuss nozzle drags, travel scars, and fine-tuning print speed or hop height with real-world models.
What is Z-hop in Orca Slicer?
Z-hop lifts the nozzle during travel moves to avoid surface scratches. Enable it for delicate prints; disable for faster, cleaner prints.
How to disable Z-hop in Orca Slicer?
Go to Print Settings > Travel, set Lift Z to 0 mm. This turns off Z-hop completely.
What is Z-hop Type B in Bambu Studio?
Z-hop Type B lifts the nozzle only when needed, using smart path detection—ideal for faster, precise printing
Should Z-hop be on or off in Bambu Studio?
ON for tall/detailed prints to prevent nozzle drag. OFF for flat, simple prints to reduce print time.
Where to find Z-hop settings in Bambu Studio?
Go to Device > Expert Mode > Travel. Adjust Z-hop when retracting, Z-hop type, and Z-hop height.
How to enable Z-hop in Bambu Studio?
Toggle Z-hop when retracting to ON, choose Type A or B, and set Z-hop height (0.2–0.6 mm recommended).
What’s the difference between Z-offset and Z-hop in Orca Slicer?
Z-offset adjusts nozzle start height; Z-hop lifts the nozzle during travel to avoid contact with prints.
What is Lift Z Enforcement in Orca Slicer?
It forces Z-hop at specific points like layer changes. Enable under Travel settings for added safety.
How does Z-hop work in PrusaSlicer?
Set Lift Z under Retraction settings. Works like Orca Slicer but without smart path options.
When should I use Z-hop?
Use it for tall, detailed, or stringy prints. Turn it off for basic, flat prints to save time.

