Orca Slicer Printer Selection: A Complete Guide for 3D Printing Enthusiasts
Orca Slicer Printer selection is the crucial step while setting it. When working with 3D printers, one of the first and most important steps in setting up your print job is choosing the correct printer and its settings in your slicing software.
Orca Slicer, a powerful 3D slicing tool, helps users select and optimize printer profiles, filament settings, and more, ensuring high-quality prints. In this guide, we’ll explore everything you need to know about Orca Slicer Printer Selection, how to download profiles, connect your printer, and troubleshoot common issues.
Orca Slicer Printer Selection
What is Orca Slicer?
Orca Slicer is an advanced 3D slicing software that provides a rich set of features for users to prepare their 3D models for printing. It supports a wide variety of printers and comes with built-in profiles for many popular models. The software is designed to offer powerful customization options for filament profiles, print settings, and much more.
Why Printer Selection Matters in Orca Slicer
Selecting the correct printer profile is crucial to ensuring that the slicer generates the right G-code for your printer. Orca Slicer’s printer selection function allows users to configure their printer settings, including print bed size, extruder type, print speed, and more. An incorrect printer profile can lead to issues like:
- Poor print quality
- Layer misalignment
- Failed prints
By choosing the correct printer from the list of available profiles, Orca Slicer ensures the software generates accurate G-code that aligns with your specific printer’s capabilities.

How to Select Your Printer in Orca Slicer?
When using Orca Slicer, the process of selecting your printer model is simple but essential. Here’s how you can select the correct printer:
- Open Orca Slicer and navigate to the Printer Settings.
- From the dropdown menu, browse the list of pre-configured printer profiles.
- If your printer is listed, select it. Orca Slicer will automatically load the settings that match your printer’s specifications.
- If your printer is not listed, you can manually create a custom printer profile or download the profile from the Orca Slicer GitHub repository.
Orca Slicer Printer Profiles: Download and Import
To save time and ensure optimal settings for your 3D printer, Orca Slicer allows users to download ready-made printer profiles. These profiles contain predefined settings for specific printer models, including:
- Print Bed Size
- Nozzle Diameter
- Max Print Speed
- Extruder Type
How to Download Printer Profiles:
- Go to the Orca Slicer or GitHub repository.
- Browse through the list of available profiles or search for your printer model.
- Download the corresponding profile file.
- Import the profile into Orca Slicer through the Profile Import function.
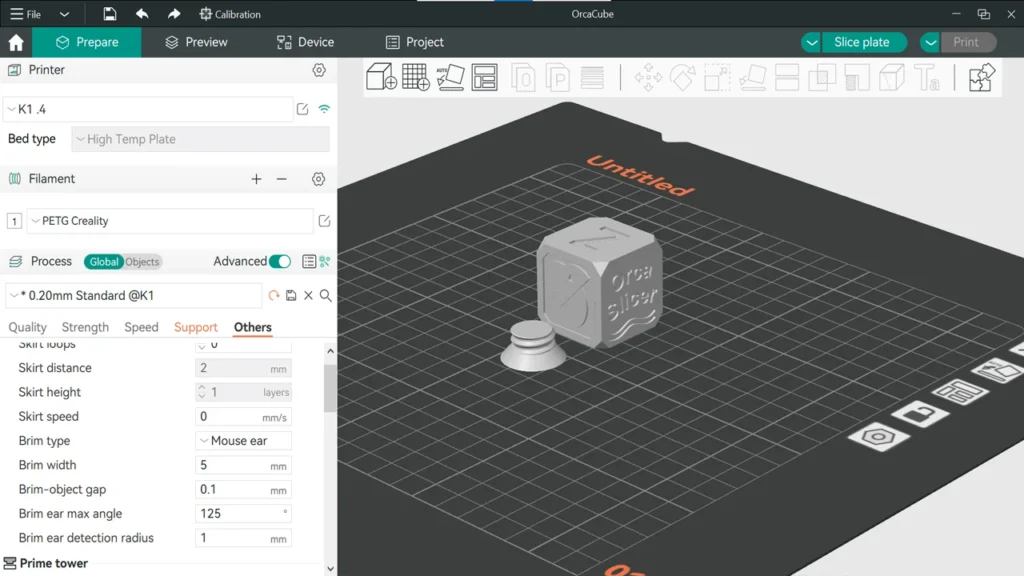
You can also download Orca Slicer filament profiles to ensure that your material settings are optimized for the best print quality.
Creating a Custom Printer Profile:
If your printer model is not available, you can create a custom profile. To do this, you need to input essential printer specifications such as:
- Max Print Volume
- Heated Bed Settings
- Print Speed Limits
- Temperature Ranges
Orca Slicer provides a comprehensive step-by-step guide to help users set up custom profiles.
Orca Slicer Printer Selection for Windows 7
If you’re running Windows 7, Orca Slicer is still compatible. However, you may need to install certain Microsoft Visual C++ Redistributable packages for optimal functionality.
- Download Orca Slicer: Visit the official Orca Slicer website and download the Windows version compatible with your operating system.
- Install the Software: Follow the installation prompts and ensure that all drivers are correctly installed for your printer.
- Select Printer Profile: Once installed, launch Orca Slicer and select your printer profile, as detailed above.
In case you run into any issues, it may be related to driver compatibility, so ensure your USB drivers are up to date for smooth communication between the software and printer.
How to Connect Your Printer to Orca Slicer
After selecting your printer model, the next step is connecting your printer to Orca Slicer. Here’s how you can do that:
- Via USB: Most printers connect through USB. Simply plug the printer into your computer.
- Network Connection: If your printer supports Wi-Fi, you can connect it wirelessly by configuring the Wi-Fi settings in the Orca Slicer software.
- Manual Connection: If automatic detection doesn’t work, go to Printer Settings and manually enter the communication parameters (e.g., port number, baud rate, etc.).
If Orca Slicer fails to detect your printer, check the cables, restart both the printer and the software, or ensure your printer’s firmware is up to date.
What Printers Are Supported by Orca Slicer?
Orca Slicer supports a wide variety of popular 3D printers, both FDM and resin types. These include well-known brands such as Creality, Anycubic, Elegoo, and Prusa.
Common Supported Printers:
- Creality Ender Series
- Anycubic i3 Mega
- Elegoo Mars and Saturn Series (Resin Printers)
- Prusa i3 MK3
If your printer isn’t directly listed, don’t worry—Orca Slicer offers the ability to create custom printer profiles, and many users share custom profiles on GitHub or the Orca Slicer community forums.
List of 3D Printers supported by Orca Slicer
| Brand | Model | Type |
|---|---|---|
| Creality | Ender 3 | FDM/FFF |
| Ender 3 V2 | FDM/FFF | |
| Ender 5 | FDM/FFF | |
| Ender 6 | FDM/FFF | |
| CR-10 | FDM/FFF | |
| CR-10 V2 | FDM/FFF | |
| CR-10 Mini | FDM/FFF | |
| Anycubic | i3 Mega | FDM/FFF |
| i3 Mega S | FDM/FFF | |
| Chiron | FDM/FFF | |
| Kossel Plus | FDM/FFF | |
| Photon (Resin) | Resin | |
| Prusa | i3 MK3 | FDM/FFF |
| i3 MK2.5S | FDM/FFF | |
| Mini | FDM/FFF | |
| SL1 (Resin) | Resin | |
| Artillery | Sidewinder X1 | FDM/FFF |
| Genius | FDM/FFF | |
| FlashForge | Adventurer 3 | FDM/FFF |
| Creator Pro | FDM/FFF | |
| Finder | FDM/FFF | |
| Elegoo | Mars | Resin |
| Mars 2 Pro | Resin | |
| Saturn | Resin | |
| Neptune 3 | FDM/FFF | |
| Anycubic | Photon Mono | Resin |
| Photon Mono X | Resin | |
| Photon S | Resin | |
| Monoprice | Select Mini V2 | FDM/FFF |
| Maker Select Plus | FDM/FFF | |
| Mini Delta | FDM/FFF | |
| FLSUN | QQ-S Pro | FDM/FFF |
| Super Racer | FDM/FFF | |
| Tevo | Tornado | FDM/FFF |
| Little Monster | FDM/FFF | |
| Sovol | SV01 | FDM/FFF |
| SV03 | FDM/FFF | |
| Xiaomi | Mijia 3D Printer | FDM/FFF |
| Wanhao | Duplicator i3 Plus | FDM/FFF |
| D9 | FDM/FFF | |
| Elegoo | Mars 2 Pro (Resin) | Resin |
| Mars (Resin) | Resin | |
| EPAX | X1 | Resin |
| X1-N | Resin | |
| SculptGL | Mono X | Resin |
Note:
- This table includes popular FDM and resin printers supported by Orca Slicer.
- If your printer is not listed, Orca Slicer allows you to create custom printer profiles.
- You can also check Orca Slicer’s official website or GitHub for additional printer profiles or community-contributed models.
Orca Slicer and Resin Printers: The New Frontier
While Orca Slicer has traditionally been popular for FDM printers, recent updates have made it increasingly effective for resin-based 3D printers. If you’re using a resin printer, Orca Slicer can handle the intricacies of resin-specific settings, including:
- Exposure Time Adjustment: Orca Slicer allows precise control over exposure times, enabling better print quality and reducing defects like layer misalignment or over-exposure.
- Resin Support Types: The latest version includes new support structures designed specifically for resin printing, making print results cleaner and easier to manage.
To use Orca Slicer with a resin printer, you’ll need to select the correct resin printer profile and input settings for exposure time, curing layers, and support structures.
Orca Slicer Cloud Integration for Printer Management
Orca Slicer now supports cloud integration, enabling users to manage multiple printers remotely and share print settings across different devices. With this feature, users can:
- Upload Printer Profiles to the Cloud: Share your custom printer profiles with the community or access shared profiles from others.
- Remote Monitoring: With cloud-connected 3D printers, users can monitor print jobs from anywhere. If your printer supports Wi-Fi, you can start, pause, or cancel prints remotely.
This cloud functionality adds significant convenience, especially for professionals managing multiple printers or printing farms.
Advanced Orca Slicer Calibration Tools for Precision
Recent versions of Orca Slicer have introduced advanced calibration tools that can help fine-tune your printer’s performance. These tools offer better accuracy for:
- Bed Leveling: A new automatic bed leveling system in Orca Slicer takes the guesswork out of leveling your print bed, making it easier to get consistent results.
- Flow Rate Calibration: Adjust the flow rate of filament automatically, ensuring that the right amount of material is extruded, preventing issues like under-extrusion or over-extrusion.
- Thermal Runaway Protection: This safeguard ensures that Orca Slicer detects if your printer is experiencing heating issues and prevents potential damage or failed prints.
With these new calibration tools, you can achieve better print quality and minimize common 3D printing issues.
How Do I Select a Printer on Chitubox?
Although this article focuses on Orca Slicer, some users also work with Chitubox. To select a printer on Chitubox, follow these steps:
- Open Chitubox and click on the “Printer” option in the top menu.
- Select “Add Printer” and search for your printer model from the list.
- If your printer is not listed, you may need to create a custom profile or download it from Chitubox’s online repository.
How to Add Custom Filament Profiles in Orca Slicer
Filament settings are just as important as printer selection. Orca Slicer allows you to set up custom filament profiles for various materials such as PLA, Overture ABS, PETG, TPU, and resins. Custom filament profiles ensure that your material properties (e.g., temperature, retraction, and speed) are optimized for the best printing results.
Steps to Create a Custom Filament Profile:
- Open Orca Slicer and go to the Filament Settings tab.
- Select “Add New Filament”.
- Input the filament’s properties, such as:
- Extrusion Temperature
- Print Speed
- Bed Temperature
- Save the profile and assign it to the desired print job.
By using the right filament profile, you can achieve consistent extrusion, prevent clogging, and enhance print adhesion.
Common Issues with Orca Slicer Printer Selection and Troubleshooting Tips
While Orca Slicer is a powerful tool, you may encounter some issues while selecting or setting up your printer. Below are some common problems and troubleshooting tips:
1. Orca Slicer Not Detecting Printer:
- Ensure correct USB connection: If using USB, ensure the cable is plugged in properly and that your printer is powered on.
- Update printer drivers: Outdated drivers can prevent Orca Slicer from recognizing your printer. Therefore, keep your Orca Slicer updated. Learn how to update Orca Slicer here.
- Manual port configuration: Go to the Printer Settings and manually select the connection port if auto-detection fails.
2. G-code Not Working:
- Printer Firmware Compatibility: Ensure your printer firmware is compatible with the G-code generated by Orca Slicer. Some custom printers may require specific adjustments in G-code.
- Recalibrate your printer: Inaccurate settings such as bed leveling or extruder calibration may affect the print quality.
3. Print Quality Issues:
- Check filament profiles: Make sure you’ve selected the correct filament profile with proper temperature, retraction, and print speed settings.
- Adjust print speed and layer height: Slow down the print speed or adjust the layer height for finer details.
Advanced Orca Slicer Features
How to Create Nozzle and Filament Profiles in Orca Slicer
- Create Nozzle: To create a custom nozzle for your existing printer, go to the printer settings in Orca Slicer, select “Nozzle” and input the correct parameters for your nozzle size.
- Create Filament: Customize your filament settings by selecting “Filament” from the settings menu and inputting details such as filament type, diameter, temperature, and print speed.
- Create New Printer: If your printer is not listed, you can manually create a new printer profile by going to “Printer Settings” and entering specifications like print bed size, maximum print speed, and supported materials.
Orca Slicer Printer Calibration
Orca Slicer printer calibration is essential to achieving high-quality prints. Make sure to calibrate your printer regularly to ensure accurate layer deposition, accurate nozzle height, and proper filament flow.
- Use the calibration wizards in Orca Slicer to adjust your extruder settings, bed leveling, and other critical parameters.
Orca Slicer GitHub Community: Sharing Printer Profiles and Troubleshooting Tips
If you’re facing issues or need additional printer profiles, the Orca Slicer GitHub repository is a valuable resource. Users frequently upload their custom profiles for various printers, which you can download for free. It’s also a great place to find solutions to common printing issues, as users often share their fixes and optimizations.
Best Practices for Orca Slicer Printer Selection
While Orca Slicer printer selection is a simple process, getting the most out of it requires paying attention to some important best practices:
- Keep Printer Firmware Updated: Ensure that your 3D printer’s firmware is up to date, as older firmware versions may not fully support the latest slicer features.
- Use Compatible Filament: Make sure the filament you are using is compatible with the printer profile you’ve selected. Custom profiles may require you to adjust parameters like extrusion multiplier and temperature.
- Test Print Regularly: If you are creating a new printer profile or tweaking settings, always perform a small test print to check for any errors or misconfigurations before committing to larger projects.
- Optimize for Speed and Quality: Depending on your project, adjust settings to balance print speed and quality. Orca Slicer’s adaptive slicing can help you achieve faster prints without sacrificing detail.
Conclusion: Optimizing Your 3D Printing with Orca Slicer Printer Selection
Selecting the right printer and configuring its settings in Orca Slicer is key to achieving high-quality, successful prints. Whether you’re using pre-configured profiles, downloading profiles from GitHub, or creating a custom profile, Orca Slicer offers a streamlined process for printer selection. By ensuring your printer is properly set up and calibrated, you can avoid common printing issues and achieve professional-level results. You can also explore best Orca Slicer Alternatives here.
By staying updated with Orca Slicer’s latest features, and regularly checking community-contributed profiles, you’ll ensure your 3D prints are always optimized and your workflow remains efficient.
Frequently Asked Questions
What is Orca Slicer and how does it work with 3D printers?
Orca Slicer is a powerful 3D slicing software that converts 3D models into G-code instructions that your 3D printer can understand. It allows you to select printer profiles, adjust settings for different filaments, and optimize print quality.
How do I select a printer in Orca Slicer?
To select a printer in Orca Slicer, simply open the software, navigate to the Printer Settings, and choose your printer model from the list of available profiles. If your printer isn’t listed, you can either create a custom profile or download one from GitHub.
Can I use Orca Slicer with Windows 7?
Yes, Orca Slicer is compatible with Windows 7. However, make sure that all necessary drivers are installed for proper communication between your printer and the software.
How do I download printer profiles for Orca Slicer?
You can download pre-configured printer profiles from the Orca Slicer official website or its GitHub repository. Simply select the profile that matches your printer model, then import it into Orca Slicer.
Does Orca Slicer support resin printers?
Yes, Orca Slicer supports both FDM and resin printers. For resin printers, you can adjust exposure time, support structures, and curing settings for optimal print results.
Why is Orca Slicer not detecting my printer?
If Orca Slicer is not detecting your printer, check your USB connection, ensure that the printer drivers are up to date, and restart both the printer and software. You can also manually select the communication port under Printer Settings.
How do I create a custom printer profile in Orca Slicer?
To create a custom printer profile, go to Printer Settings in Orca Slicer, and manually input your printer’s specifications such as print bed size, extruder type, and maximum print speed. This allows you to configure Orca Slicer for any printer not in the default list.
Can I create my own filament profiles in Orca Slicer?
Yes, Orca Slicer allows you to create custom filament profiles. You can specify the filament type, temperature settings, print speed, and retraction settings to suit different materials like PLA, ABS, PETG, and more
How do I connect my printer to Orca Slicer?
To connect your printer, simply plug it into your computer via USB, or connect wirelessly if your printer supports Wi-Fi. Orca Slicer will automatically detect the connection if everything is set up properly. You can also manually configure the communication port if needed.
How do I update Orca Slicer to the latest version?
To update Orca Slicer, check for an update notification within the software, or visit the official Orca Slicer website or GitHub page to manually download the latest version. Keeping your software up to date ensures compatibility with newer printer models and added features.
What are the common issues with Orca Slicer printer profiles?
Common issues with Orca Slicer printer profiles include incorrect G-code generation, poor print quality, or the software not detecting the printer. Ensure your printer drivers are updated, the correct profile is selected, and the printer is calibrated properly.
How do I troubleshoot Orca Slicer’s printer connection issues?
If Orca Slicer is not connecting to your printer, check the USB cable, ensure the correct drivers are installed, and verify that your printer is properly configured. Restart the software and the printer, and make sure your printer’s firmware is up to date.
Does Orca Slicer support multi-material printing?
Yes, Orca Slicer has enhanced support for multi-material printing. You can define multiple extruder settings, adjust filament profiles, and create separate settings for each material, allowing you to print with more than one filament type simultaneously.
How do I calibrate my printer in Orca Slicer?
Orca Slicer includes advanced calibration tools that help ensure accurate print results. You can calibrate bed leveling, extruder flow rate, and other settings. Follow the calibration guides in the software to adjust parameters for optimal performance.
Where can I find additional printer profiles for Orca Slicer?
Additional printer profiles can be found in the Orca Slicer GitHub repository, where community members share custom profiles for various 3D printer models. You can download and import these profiles directly into the software to get started with the right settings.
What is Elephant Foot Compensation in Orca Slicer?
Elephant foot compensation in Orca Slicer helps reduce the slight bulge that forms at the base of 3D prints due to bed adhesion and heat spread. By adjusting this setting, you can fine-tune the initial layer size and avoid overly wide or warped bases. It’s ideal for achieving crisp, dimensionally accurate prints.
How to Set the Extrusion Multiplier in Orca Slicer?
The extrusion multiplier in Orca Slicer controls how much filament is pushed through the nozzle. A value too high leads to over-extrusion, while too low causes gaps. Start with 1.0 and fine-tune based on material flow during calibration. It’s crucial for improving layer bonding and dimensional accuracy.
How Do I Emboss Text in Orca Slicer?
To emboss text in Orca Slicer, you’ll need to design your 3D model in CAD software (e.g., Fusion 360 or Tinkercad) with text raised above or recessed into the surface. Orca Slicer will then slice it accurately for print. The slicer doesn’t add text directly but supports embossing through imported models.
How to Enable Support Generation in Orca Slicer?
To enable support generation in Orca Slicer, go to the Support tab and toggle on “Generate Support.” You can customize support style, density, and overhang angle for easier removal. It’s ideal for models with bridges, overhangs, or intricate geometry.
What Does Detect Thin Walls Do in Orca Slicer?
Detect Thin Walls in Orca Slicer allows the slicer to recognize and properly print small, narrow features that may otherwise be skipped. It ensures better detail preservation in thin sections of your model and prevents structural weaknesses in precision prints.
What Is Drop to Plate in Orca Slicer?
Drop to Plate in Orca Slicer moves your model to sit flush with the print bed, correcting any parts that are floating or embedded below the build surface. It ensures better adhesion and proper slicing, especially after rotating or scaling imported objects.
How to Disable Z-Hop in Orca Slicer?
To disable Z-hop in Orca Slicer, go to the “Movement” or “Retraction” settings and uncheck “Enable Z-Hop.” Disabling Z-hop can reduce print time and eliminate unnecessary vertical movements, especially when printing simple or low-profile models.
How to Use Exclude Object in Orca Slicer?
Exclude Object lets you skip printing specific models or parts of a multi-object plate without removing them from the layout. You can use it for isolating print failures or reprinting only selected components. Access it via the object list or right-click menu during preview.

One Comment