Orca Slicer Calibration Guide: Optimize Your 3D Prints
Orca Slicer calibration is essential for achieving high-quality 3D prints with accurate dimensions, strong layer adhesion, and minimal print defects. This guide covers various calibration steps, including flow rate calibration, pressure advance, and retraction tests, to optimize your 3D printer’s performance using OrcaSlicer.
Calibration is crucial for achieving high-precision prints with optimal material flow and dimensional accuracy. With OrcaSlicer, users get powerful tools to fine-tune their printers, similar to Bambu Studio, ensuring consistent results across multiple brands of 3D printers.
Orca Slicer Calibration
Why Do You Need to Calibrate Your 3D Printer?
Calibration is crucial for achieving high-quality prints with minimal errors. Without proper calibration, issues such as under-extrusion, over-extrusion, stringing, and layer inconsistencies can arise. The key benefits of calibration include:
- Improved Print Quality: Reduces artifacts like ringing and layer inconsistencies.
- Optimal Material Usage: Ensures the right flow rate to avoid excess material waste.
- Precision & Accuracy: Helps produce dimensionally accurate parts.
- Better Adhesion & Strength: Properly tuned settings enhance print bed adhesion and layer bonding.
If you aren’t already using OrcaSlicer, or would like to learn more about it, check out our guide on getting started with OrcaSlicer.
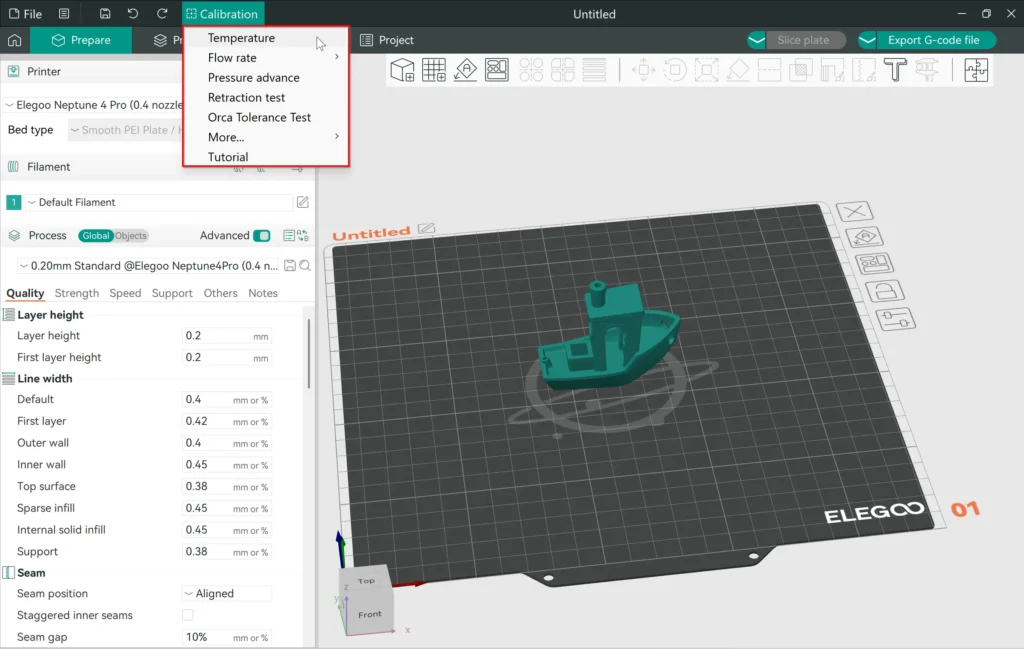
The OrcaSlicer Calibration Menu
The OrcaSlicer Calibration menu provides several tools to fine-tune your printer’s performance. Each test addresses a different aspect of the print process. Below, we explore these tools and how to use them effectively.
OrcaSlicer provides a dedicated calibration menu that offers various tools to fine-tune settings. These include:
- Temperature Tower: Identifies the ideal printing temperature for different filaments.
- Flow Rate Test: Ensures the right extrusion amount to avoid under or over-extrusion.
- Pressure Advance Calibration: Optimizes material flow during rapid movement changes.
- Tolerance Test: Checks dimensional accuracy by printing precision test models.
- Max (Volumetric) Flow Rate: Finds the maximum extrusion speed for your setup.
- Vertical Fine Artifacts: Helps eliminate surface imperfections.
- Retraction Test: Prevents stringing and oozing by adjusting retraction distance and speed.
Step-by-Step Orca Slicer Calibration Process
Setting Up Calibration Order
- Follow a structured approach: Temperature → Flow Rate → Pressure Advance → Retraction.
- Use Orca Slicer Calibration Order to guide step-by-step tuning.
1. Orca Slicer Temperature Tower Calibration
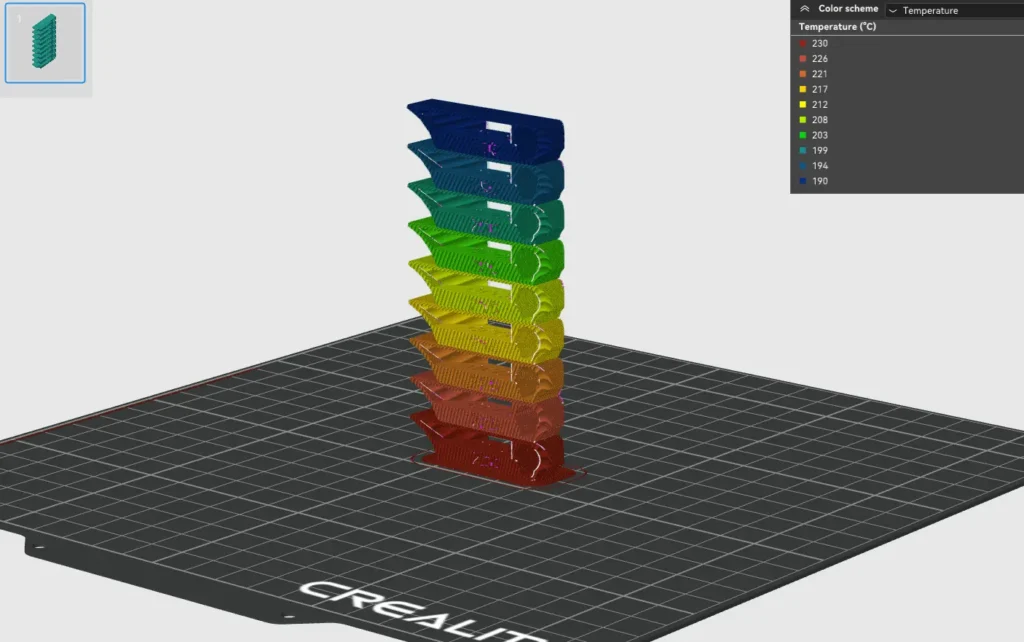
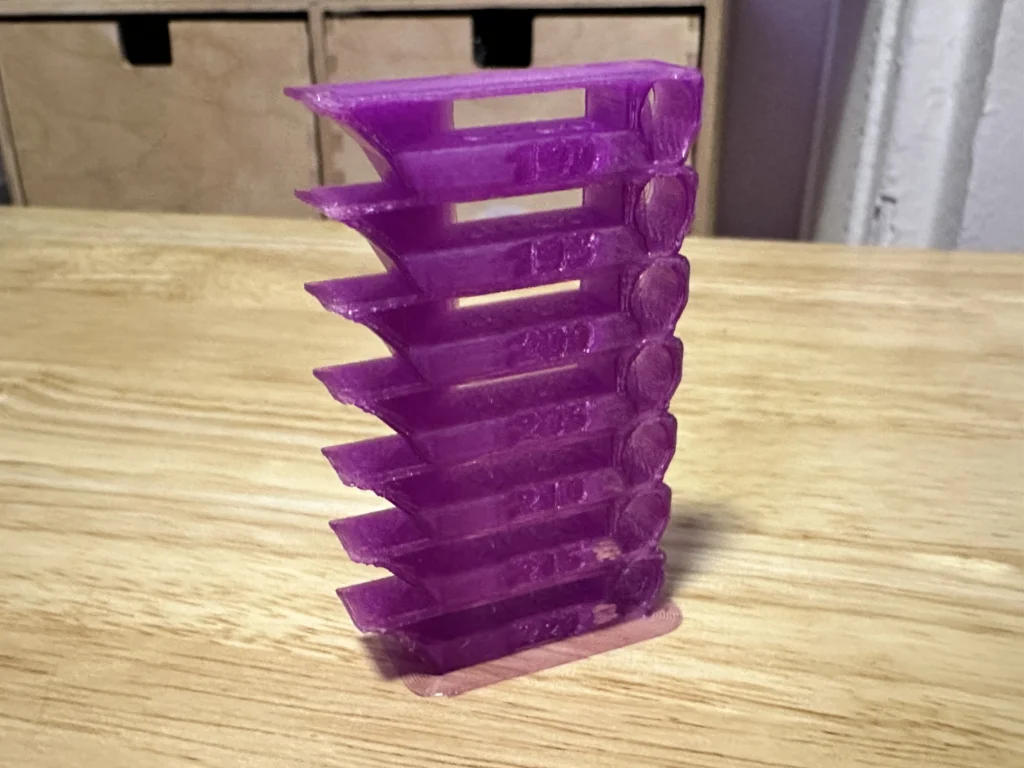
A Temperature Tower test helps determine the optimal printing temperature for a specific filament. This is crucial for improving layer adhesion and reducing print defects like stringing.
- Adjust temperature in increments (e.g., 5°C) for each section of the tower to observe how the filament reacts to different heat levels. This allows for a thorough evaluation of layer adhesion, stringing, bridging, and surface quality, helping to pinpoint the optimal printing temperature for the best results.
How to Analyze Results?
- Analyze surface finish, bridging, layer adhesion, stringing, and overhang quality at different temperatures. Observe how the filament reacts to variations in heat, ensuring optimal print settings for strength, detail, and consistency.
2. Flow Rate Calibration
Flow rate calibration ensures that the right amount of filament is extruded for consistent layer thickness.
- Print a flow rate calibration cube and measure the walls using calipers. Compare the measured wall thickness to the expected value in your slicer settings. If discrepancies exist, adjust the flow rate percentage in OrcaSlicer to fine-tune extrusion consistency. Repeat the process until the printed walls closely match the expected thickness, ensuring optimal material flow and dimensional accuracy.
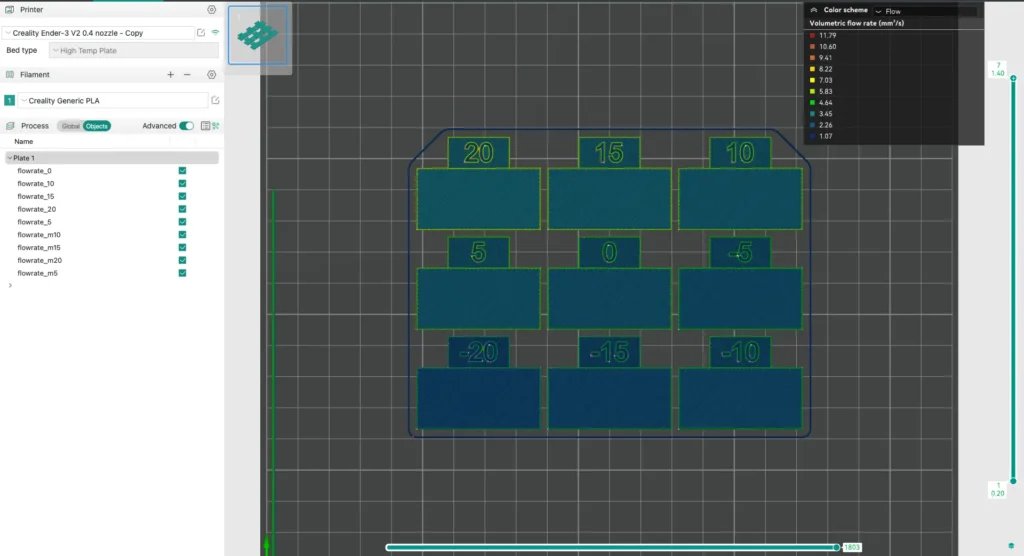
- Adjust the flow rate in OrcaSlicer to fine-tune extrusion consistency. This process involves printing a flow rate calibration cube, measuring the wall thickness using calipers, and comparing it with the expected values in your slicer settings. If the printed thickness deviates, make incremental adjustments to the flow rate percentage in OrcaSlicer until the printed walls closely match the expected dimensions. This ensures accurate material flow, preventing issues like over-extrusion or under-extrusion, and ultimately enhances print precision and quality.
3. Pressure Advance Calibration
Pressure advance calibration optimizes the response time of filament flow, reducing stringing and improving corner sharpness.
- Print a pressure advance test pattern to fine-tune filament flow response. This test helps reduce stringing, improve corner sharpness, and enhance extrusion consistency by adjusting pressure advance settings. By analyzing the printed pattern, you can determine the optimal value to ensure smooth transitions and precise detailing in your prints.

- Adjust values incrementally until extrusion remains consistent, particularly on retractions and corners. Observe extrusion flow at different speeds and fine-tune pressure advance settings to achieve sharp corners and minimal stringing, ensuring optimal print quality.
Calibrating Pressure Advance (PA) in Orca Slicer is essential for achieving optimal extrusion control and eliminating print defects such as blobs, under-extrusion at corners, and inconsistent flow. Three primary methods are used for PA calibration: Line Method, Pattern Method, and Tower Method. Each technique varies in complexity, accuracy, and reliance on first-layer quality.
1. Line Method
The Line Method is a fast and straightforward PA calibration technique that requires minimal setup. However, its accuracy heavily depends on a well-leveled first layer. Enabling bed mesh leveling is highly recommended for reliable results.
Step-by-Step Calibration Process:
- Select the appropriate printer, filament, and slicing profile.
- Start the print and observe the resulting lines.
- Identify the line that maintains the sharpest angle with minimal filament separation.
- Choose the most even line and apply its corresponding PA value in the filament settings.
Optimal PA Value:
- In many cases, 0.016 is found to be the optimal PA value, but this may vary based on filament type and extruder configuration.
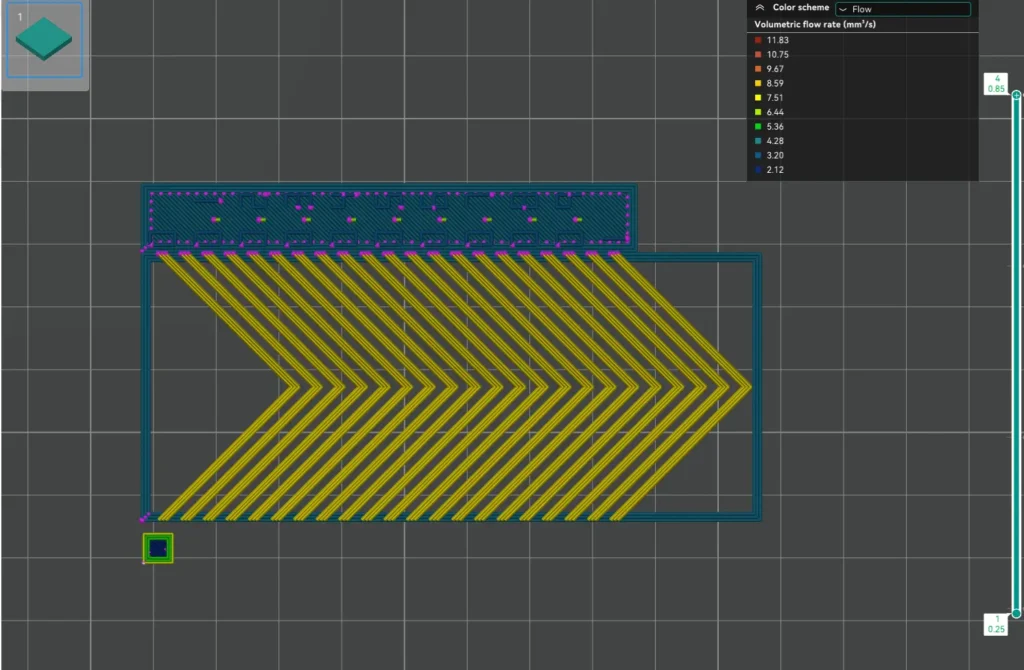
2. Pattern Method: Advanced Precision Calibration
What is the Pattern Method?
The Pattern Method is derived from Andrew Ellis’ pattern method generator, which itself is based on the Marlin pattern method developed by Sineos. This approach provides a structured and precise way to determine the ideal PA value.
How Does the Test Work?
When initiating the test, you will notice a small rectangular prism on the build plate. This prism serves multiple functions:
- Acts as a base layer to insert the custom G-Code test pattern.
- Allows repositioning of the test pattern by moving the prism.
- Uses the same filament for both the prism and test pattern, ensuring material consistency.
Steps to Perform the Test:
- Load the calibration project in Orca Slicer.
- Initiate the test from the Calibration Menu.
- Adjust the filament settings in the Prepare pane as needed.
- Review the test pattern in the Preview pane before printing.
- Print the test and analyze the extrusion behavior across different sections.
3. Tower Method: Most Accurate PA Calibration
What is the Tower Method?
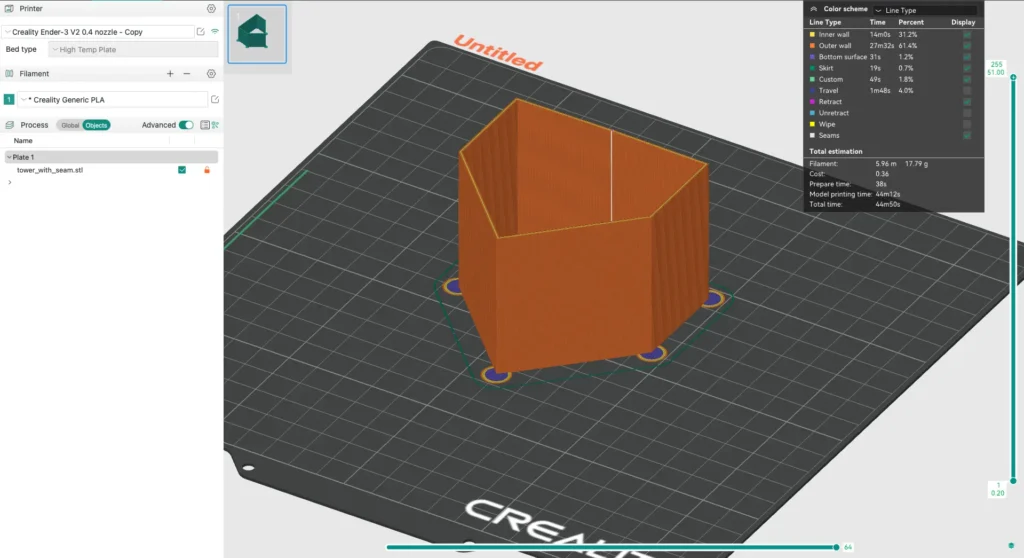
The Tower Method is the most comprehensive and accurate approach for PA calibration. Unlike the Line Method, it does not depend on the quality of the first layer. Instead, it progressively modifies the PA value at fixed height increments.
How the PA Tower Works:
- The PA value increases by 0.002 for every 1mm height in a direct drive extruder (DDE) setup.
- For Bowden extruders, the PA value increases by 0.02 per mm.
Steps to Run the PA Tower Test:
- Select the appropriate printer, filament, and print profile.
- Navigate to the Calibration Menu and choose:
- “Pressure Advance”
- “DDE” (Direct Drive Extruder) or “Bowden”
- “PA Tower”
- Start the print and observe the layer transitions.
Analyzing the Results:
- Examine each corner of the print using calipers or a ruler.
- Identify the height where corners appear the sharpest and most consistent.
- Use the corresponding PA value at that height for optimal settings.
Choosing the Best PA Calibration Method
Each method has its strengths:
- Line Method: Best for quick and rough calibration but less precise.
- Pattern Method: Provides structured results and improved accuracy.
- Tower Method: The most precise but time-consuming calibration.
For professional 3D printing workflows, we recommend starting with the Tower Method for a highly accurate baseline, followed by Pattern Method fine-tuning for specific filament types.
4. Tolerance & Dimensional Accuracy Tests
This test checks the accuracy of dimensional prints, ensuring that your printer can maintain tight tolerances.
- Print a tolerance test object to evaluate your printer’s dimensional accuracy. The test object typically consists of a series of nested parts or precisely measured gaps that challenge the printer’s ability to reproduce fine tolerances. By measuring the printed object and comparing it with the expected dimensions, you can determine how well your printer maintains accuracy and whether any adjustments are needed in your slicer settings or hardware calibration.
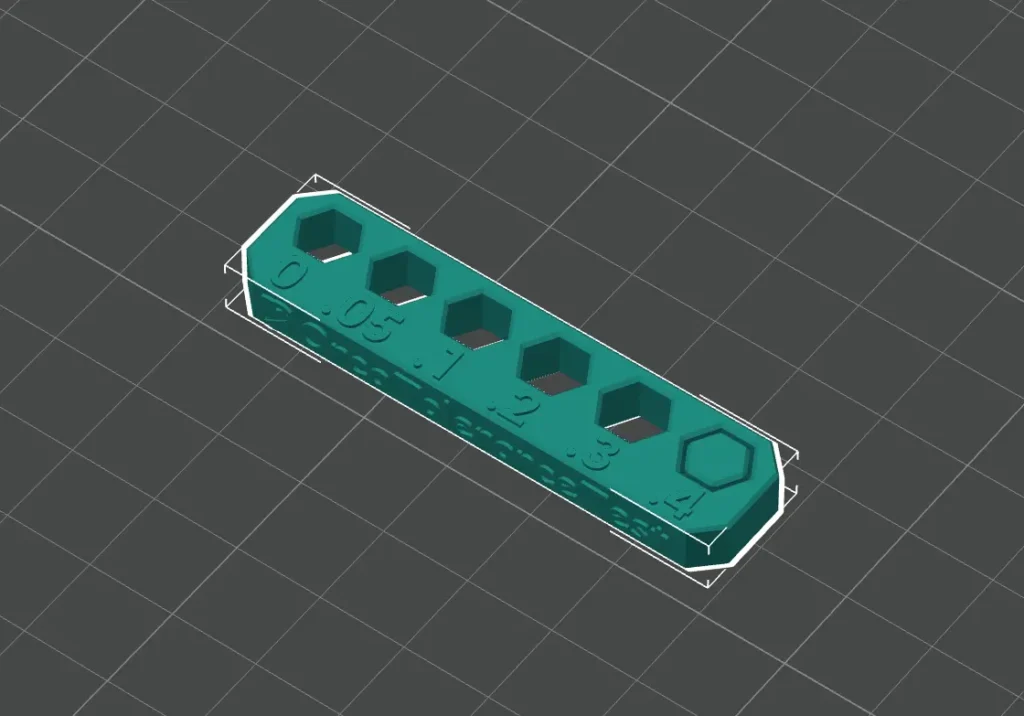
- Print a calibration object and measure its dimensions using calipers. Compare these measurements with the expected values in the slicer settings to assess accuracy. If discrepancies exist, adjust steps per mm, flow rate, or other relevant parameters to fine-tune precision.
5. Advanced Clibration: Max (Volumetric) Flow Rate
Determines the maximum speed at which your printer can extrude material without under-extrusion.
- Print a speed tower or extrusion test line to determine the maximum volumetric flow rate of your printer. This test involves printing sections at increasing speeds to observe when under-extrusion starts occurring. By analyzing the print, you can find the optimal speed at which your printer can extrude material consistently without losing print quality. Adjust the speed settings accordingly to balance speed and print precision.
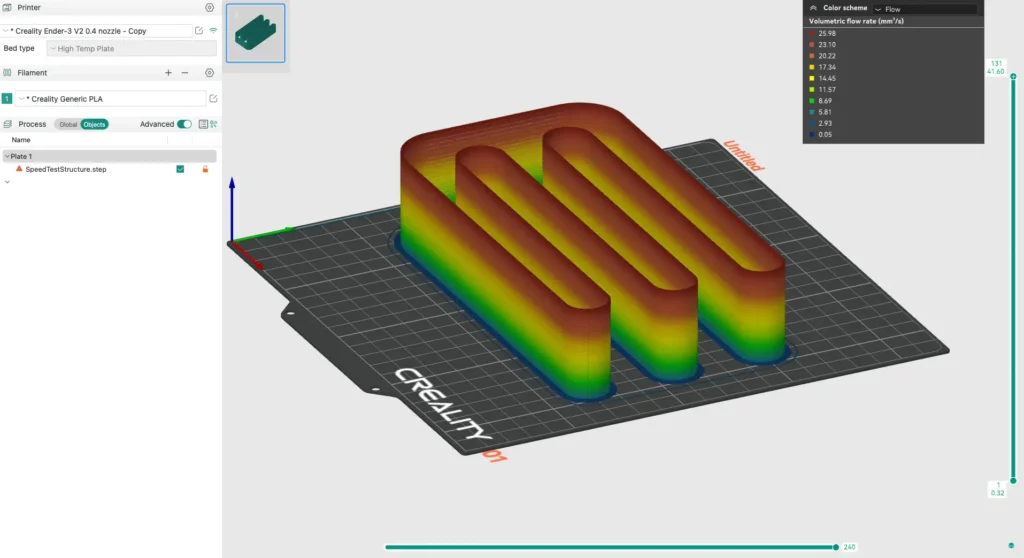
- Gradually increase the printing speed in increments while monitoring for signs of under-extrusion, such as gaps in layers or inconsistent extrusion. Once under-extrusion becomes noticeable, reduce the speed slightly to find the optimal balance between print quality and speed.
6. Vertical Fine Artifacts (VFA)
This test helps detect and correct issues related to Z-axis movement, such as Z-banding and layer inconsistencies.
- Print a vertical test column to evaluate Z-axis consistency and detect layer inconsistencies, such as Z-banding or wobbling. This test helps fine-tune Z-axis movement by identifying mechanical or firmware-related issues that may affect print quality. Observing variations in layer uniformity allows for adjustments to Z-axis stepper motor settings, lead screw lubrication, or frame stability, ensuring smoother prints with consistent layer alignment.
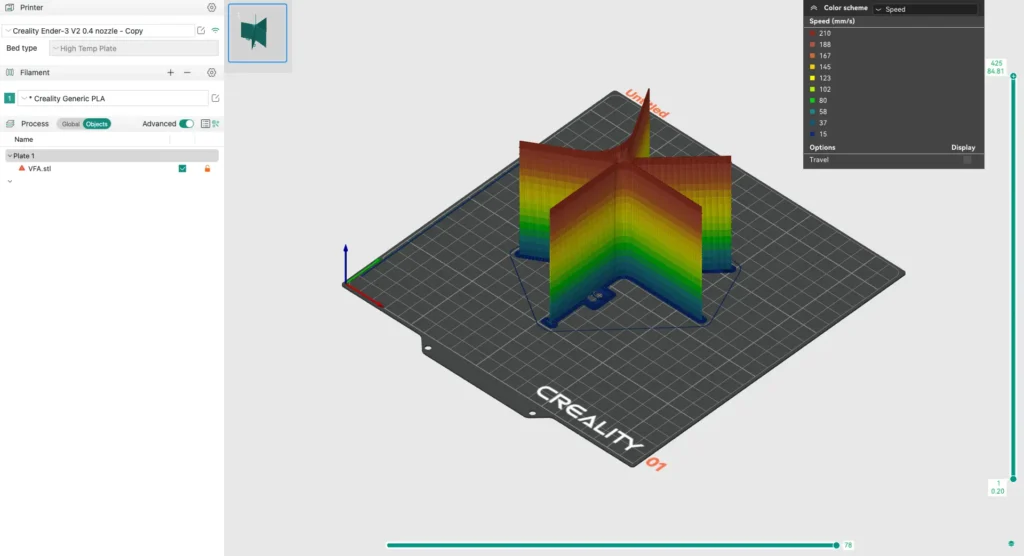
- Analyze layer uniformity by closely inspecting the printed test column. Look for any signs of Z-banding, layer shifts, or inconsistencies. If issues are detected, adjust Z-axis settings by fine-tuning the stepper motor current, checking for loose components, and ensuring the lead screw is properly lubricated and aligned. Additionally, consider enabling Z-hop or tweaking microstepping settings to enhance vertical precision.
7. Retraction & Stringing Test
A retraction test helps fine-tune filament retraction settings to reduce stringing and improve print quality. The test involves printing a retraction tower or similar test object with varying retraction distances and speeds. By analyzing the results, you can determine the optimal retraction settings for your filament and printer setup.

Adjusting these parameters prevents excessive oozing while avoiding filament grinding or gaps in extrusion. This test is essential for achieving clean, detailed prints, especially on models with multiple retractions and intricate features. A retraction test minimizes stringing by adjusting retraction distance and speed.
- Print a retraction tower.
- Adjust retraction settings to find the optimal balance between oozing and excessive filament pullback.
Common Issues & Troubleshooting
Orca Slicer Calibration Greyed Out
If certain calibration options in OrcaSlicer appear greyed out, it could be due to a few reasons:
- Printer Profile Not Selected: Ensure that a 3D printer profile is selected in the slicer.
- Unsupported Features for the Selected Printer: Some calibration options may not be available for certain printer models.
- Required Settings Disabled: Some calibration tests depend on specific settings, such as enabling adaptive layers or using the correct filament profile.
- Software Version Issue: Updating to the latest version of OrcaSlicer can resolve missing or greyed-out features.
- Configuration Conflicts: Resetting the slicer settings or reloading the printer profile may help restore calibration options. If certain calibration options are greyed out:
- Ensure that a printer profile is selected.
- Check if required settings are enabled in the software.
Orca Slicer Calibration Tools Not Working?
- Restart Orca Slicer and reconfigure printer settings.
- Ensure firmware is up to date and supports OrcaSlicer tools.
- Try running individual calibration tests separately.
OrcaSlicer Calibration Cube
Printing a calibration cube helps measure dimensional accuracy and detect flow rate inconsistencies.
OrcaSlicer Flow Rate Test
- Measure wall thickness and compare with expected values.
- Adjust flow rate percentage accordingly.
Orca Slicer Pressure Advance Calibration
- Fine-tune pressure advance to improve sharp corners and eliminate overshoot.
Orca Slicer Calibration YOLO (Automatic Mode)
- If you want an automated calibration, use the YOLO setting in OrcaSlicer.
- This feature lets the slicer estimate settings without manual tweaking.
Conclusion
Calibration is key to achieving professional-quality prints with OrcaSlicer. Whether you use a Bambu Lab printer, Prusa, or Creality, these calibration steps will enhance accuracy, eliminate defects, and optimize performance. Follow this guide, and you’ll master OrcaSlicer calibration like a pro!
Calibrating your 3D printer using OrcaSlicer’s built-in tools ensures optimal performance and print quality. By systematically running these tests and adjusting settings, you can eliminate defects and achieve high-precision prints. Whether you’re a beginner or an advanced user, proper calibration is key to unlocking the full potential of your 3D printer.
Frequently Asked Questions
What is the correct calibration order in Orca Slicer?
The recommended calibration order is:
Temperature Tower – Find the optimal filament temperature.
Flow Rate Calibration – Adjust extrusion to avoid over/under-extrusion.
Pressure Advance Calibration – Improve print quality at high speeds.
Retraction Test – Minimize stringing and blobs.
Tolerance Test – Check dimensional accuracy.
Max (Volumetric) Flow Rate – Determine the printer’s max extrusion capacity.
Vertical Fine Artifacts – Reduce surface imperfections.
How do I manually calibrate my 3D printer in Orca Slicer?
Open OrcaSlicer > Calibration Menu.
Run each test individually (temperature, flow rate, pressure advance, etc.).
Adjust settings based on test results.
Save the optimized profile for future prints.
What is Orca Slicer Pressure Advance Calibration?
Pressure Advance helps compensate for extrusion delays when the printer accelerates or decelerates.
If corners look blobby, increase the pressure advance value.
If corners look under-extruded, decrease the value.
Run the Pressure Advance Calibration Test and adjust settings accordingly.
What is the Orca Slicer Flow Rate Test, and how do I use it?
The Flow Rate Test ensures that your printer extrudes the correct amount of filament.
Print an Orca Slicer Calibration Cube and measure its walls.
Compare the thickness to the expected value and adjust the extrusion multiplier if necessary.
Why is my Orca Slicer Calibration menu greyed out?
If calibration options are greyed out, check:
Printer Profile Compatibility – Some settings are disabled for certain printers.
Firmware Support – Ensure your printer’s firmware supports advanced calibration tools.
Filament and Nozzle Settings – Some options are material-specific.
What is Orca Slicer Calibration YOLO mode?
YOLO mode is an automatic calibration feature that estimates optimal settings without manual input.
Useful for quick calibration, but manual tuning may provide better results.
Ideal for beginners or those who don’t want to fine-tune settings.
What are the main calibration tools in Orca Slicer?
Orca Slicer provides:
Temperature Tower – Determines best temperature for filament.
Flow Rate Test – Adjusts extrusion multiplier.
Pressure Advance – Improves corner sharpness.
Retraction Test – Reduces stringing.
Tolerance Test – Ensures dimensional accuracy.
Max Volumetric Flow Test – Finds max extrusion capacity.
Vertical Fine Artifacts Test – Fixes surface defects.
How do I troubleshoot calibration issues in Orca Slicer?
Print a calibration cube and check for over/under-extrusion.
Compare print quality before and after calibration.
Restart OrcaSlicer if calibration tools aren’t working.
Update printer firmware if features seem disabled.
How often should I calibrate my 3D printer?
Every new filament roll – Different brands/materials require different settings.
After hardware changes – New nozzles, hotends, or extruders need recalibration.
If print quality decreases – Regular tuning helps maintain precision.




6 Comments