Orca Slicer Layer Height Settings: Guide 2026
Layer height is the single setting that most people tune first and understand least. It’s one number, measured in millimeters, and it quietly controls how smooth your print looks, how strong it ends up being, and how long you’ll be waiting for it. Get it wrong and you’ll either wait six hours for a part you needed in two, or watch a curved surface come out looking like a staircase.
This guide covers every layer height decision you’ll face in Orca Slicer — the official nozzle-size ranges, first layer height, material-by-material recommendations, the variable layer height feature, and what to do when something looks wrong — in one place, so you don’t need to piece it together from six different forum threads.
What Layer Height Actually Is?
Layer height is the vertical thickness of each pass your nozzle makes as it builds a model upward — the Z-axis resolution of the print. It’s easy to confuse with two other numbers that sound similar but do different jobs: nozzle diameter controls how wide each printed line is (an XY-plane property), while layer height controls how tall each slice is (a Z-axis property). A 0.4mm nozzle can print at many different layer heights; the nozzle just sets the outer limit of what’s physically sensible.
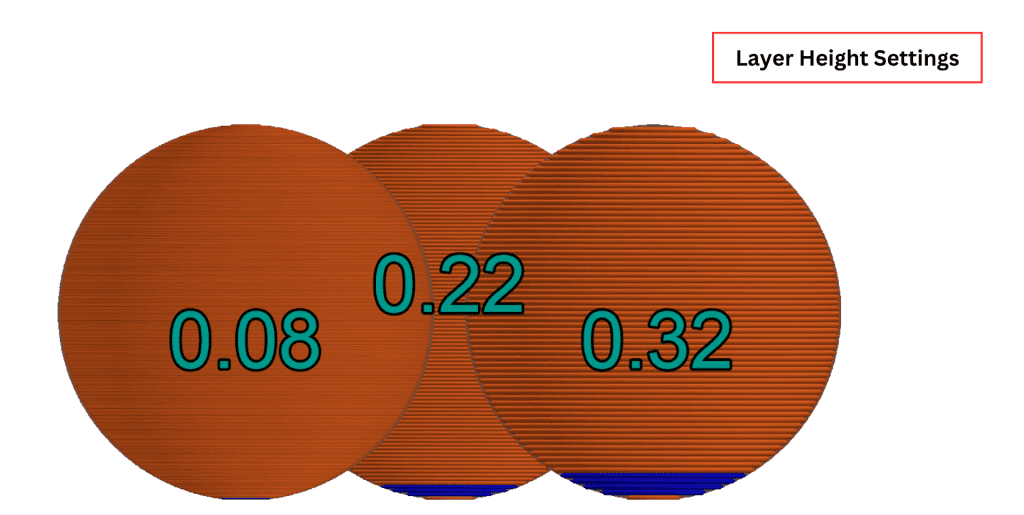
Every horizontal or gently sloped surface in your model is built from a stack of these layers, and the thickness of that stack is what determines whether a curve reads as smooth or as a visible set of steps — the “staircase effect” you see on domes, spheres, and angled surfaces at coarse layer heights.
Layer Height Settings Guidelines 2026
Where to Find Layer Height in Orca Slicer
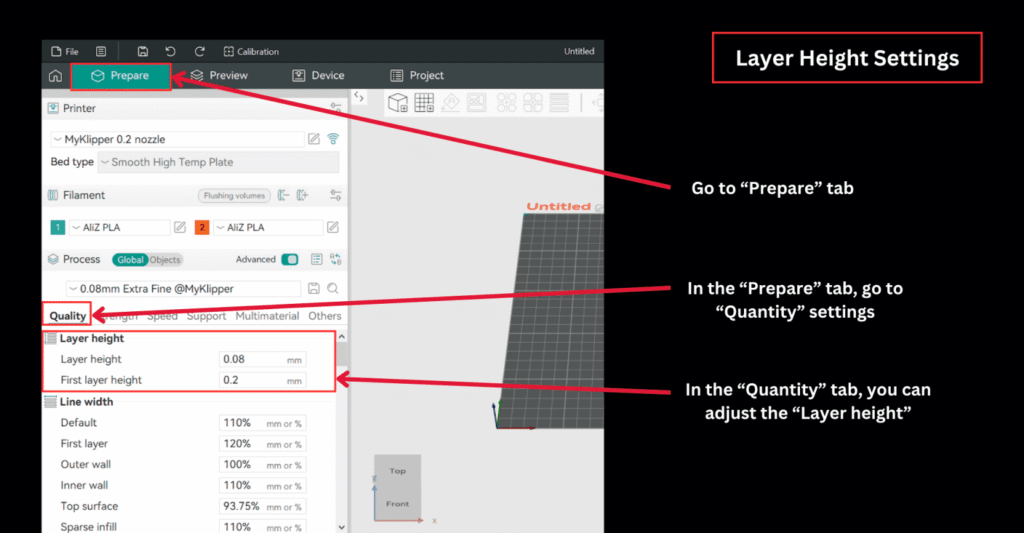
Layer height lives under the Prepare tab, in the Quality section of the process settings panel. Two related fields sit right next to each other:
- Layer Height — the value used for the bulk of the print
- Initial Layer Height (first layer height) — a separate value used only for layer one
The Official Nozzle Size Reference
Orca Slicer’s own documentation gives a straightforward rule: keep layer height between 20% and 80% of your nozzle diameter, with a comfortable working range closer to 40–60% for most prints. Here’s the official reference range by nozzle size, along with a sensible first-layer starting point for each:
| Nozzle diameter | Minimum layer height | Maximum layer height | Suggested first layer height |
|---|---|---|---|
| 0.2mm | 0.04mm | 0.16mm | 0.12mm |
| 0.3mm | 0.06mm | 0.24mm | 0.18mm |
| 0.4mm | 0.08mm | 0.32mm | 0.25mm |
| 0.5mm | 0.10mm | 0.40mm | 0.30mm |
| 0.6mm | 0.12mm | 0.48mm | 0.35mm |
Go below the minimum and you risk flow inconsistencies and a scaly “fish scale” surface pattern, especially at higher print speeds. Go above the maximum and layer adhesion suffers — you’ll see weaker bonds between layers and a rougher overall finish.
First Layer Height: Why It’s Different
The first layer gets its own setting because it has a different job than every layer after it. Layers two and up are about detail and speed; layer one is entirely about getting the print to stick to the bed and survive the next few hours.
A thicker first layer pushes more material into the build surface, which:
- Improves bed adhesion, especially on slightly uneven or textured surfaces (PEI sheets in particular)
- Compensates for minor bed-leveling imperfections that would otherwise cause gaps or scraping
- Gives the print a more forgiving foundation, reducing the odds of a failed first layer
For a 0.4mm nozzle, a first layer height around 0.25mm (roughly 62.5% of the nozzle diameter) is a reliable starting point. Going much beyond about 65% of the nozzle diameter starts to risk adhesion problems rather than help them, so more isn’t always better here — there’s a sweet spot, not a “thicker is safer” rule.
How Layer Height Affects Print Time
This is where layer height stops being abstract and starts being a real scheduling decision. The relationship is close to linear: half the layer height means close to double the number of layers, and print time scales with layer count.
To put real numbers on it, using the standard 3D Benchy calibration model as a reference point:
| Layer height | Approx. layer count | Approx. print time (relative) |
|---|---|---|
| 0.1mm | ~480 layers | Slowest — roughly 2x the 0.2mm time |
| 0.2mm | ~240 layers | Baseline |
| 0.28–0.3mm | ~160 layers | Fastest — roughly 30–40% faster than 0.2mm |
The gap widens further as models get larger — the same ratio applies, but the absolute time difference between 0.1mm and 0.3mm can stretch from minutes on a small print to many hours on a large one.
Settings in Orca Slicer for Layer Height
In Orca Slicer, while configuring settings in the “Prepare” tab, go to the “Quality” tab in the submenu, where you can set the layer heights for all your print layers.
- Layer height: adjust as per your requirements in mm
- First layer: set it between 20% and 80%, depending on your print.
- Adjust the other settings according to your print dimensions.
- Finalise other settings and print what you are up to.
How Layer Height Affects Strength
Does a thinner layer height make a print stronger?
Not always. Some tests show thinner layers gaining a modest strength edge; other tests show 0.2–0.3mm layers matching or beating 0.1mm. Layer count and bonding interact in ways that don’t always favor the finest option.
What’s the best layer height for strong, functional parts?
0.2–0.28mm. Wall count, infill, and material choice affect strength more than layer height does. Save the finest layer heights for visual detail, not load-bearing parts.
Is 0.16mm a good middle-ground layer height?
Usually not. It costs noticeably more print time than 0.2mm for only a small, often barely visible quality gain. Pick 0.12mm if you want real detail, or stay at 0.2mm if you don’t.
Material-Specific Layer Height Recommendations
PLA
The most forgiving material across the board — prints cleanly from roughly 0.08mm up to 0.32mm without major adjustment. 0.2mm is the standard default for a 0.4mm nozzle. Drop to 0.12mm for miniatures and fine detail; raise to 0.28mm for bulk, non-visible parts.
PETG
Actually prefers slightly thicker layers rather than thinner ones — 0.2mm and up tends to look and perform better than very fine layers, since PETG’s glossy finish already hides layer lines well and thin layers can worsen stringing. 0.24mm is a solid choice for functional PETG parts.
ABS / ASA
0.2mm is the standard default. Because ABS shrinks noticeably as it cools, thicker layers compound warping risk — stay at 0.2mm or below rather than pushing toward 0.28–0.3mm, and rely on an enclosure or heated chamber for larger parts.
TPU (flexible)
0.2mm is generally the practical maximum. TPU’s flexibility makes thick layers feel noticeably less solid, so 0.16mm is a better default for functional flexible parts where layer bonding matters.
Nylon
A 0.4mm nozzle typically works across roughly 0.2–0.35mm for nylon. Thinner layers (around 0.15mm) can add detail but also raise warping risk, since nylon shrinks on cooling — moderate layer heights are usually the safer default.
Carbon/glass-fiber filled
Stick to 0.2mm minimum with a hardened nozzle. Fine layer heights push more fiber content through a smaller gap per pass, raising the risk of nozzle clogging on abrasive filaments.
Layer Height and Overhangs
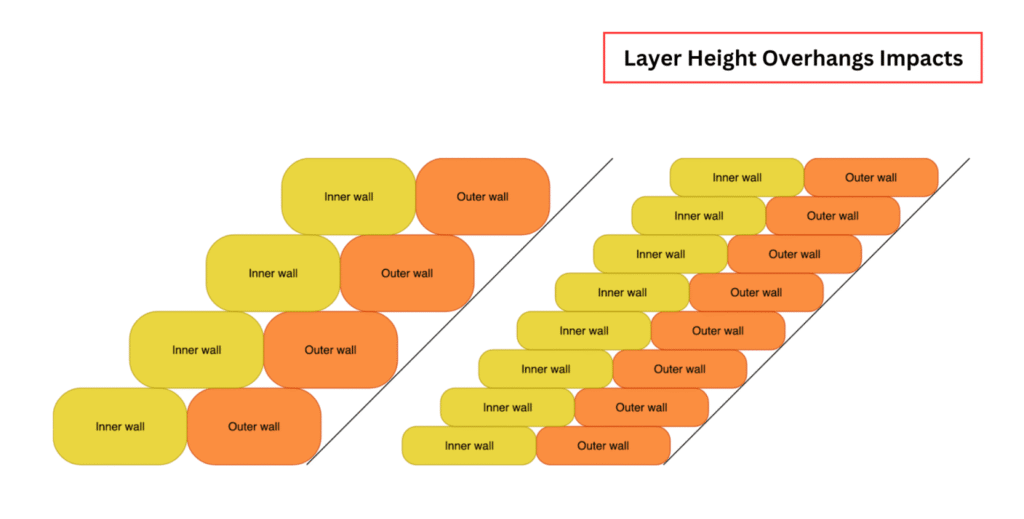
Layer height changes how forgiving your printer is on unsupported, angled geometry. Thinner layers reduce the horizontal shift between one layer and the next, keeping unsupported sections tighter and printable at steeper angles before sagging sets in. Thicker layers widen that gap between layers, increasing the chance of drooping and often requiring support material at shallower angles than a thinner-layer version of the same model would need. If your model leans heavily on overhangs and bridges rather than needing raw speed, lean the layer height decision toward thinner rather than thicker.
Variable (Adaptive) Layer Height
Uniform layer height works fine for boxy, mostly-flat models, but curved and organic shapes expose its weakness: a fixed 0.2mm layer looks fine on flat surfaces and rough on a sphere’s equator, where the staircase effect is most visible. Variable layer height solves this by adjusting thickness across the model instead of applying one number everywhere — thin layers on curves and detail, thick layers on flat or simple sections, in the same print.
How It Works
- Select the model and open the Variable Layer Height tool from the top toolbar.
- Orca Slicer analyzes the geometry and proposes a layer height profile, shown as a color-coded bar next to the model — thinner layers (finer detail) at one end of the scale, thicker layers (faster, less detail) at the other.
- Use the Quality/Speed slider to bias the whole profile — push toward Quality for finer layers and more detail overall, or toward Speed for thicker layers and a faster print.
- Adjust the smoothing radius, which controls a Gaussian filter blending the transitions between different layer heights. A larger radius creates smoother transitions between thick and thin sections, reducing any visible “jump” where the layer height changes.
- Enable Keep Minimum if you want the finest layer height in your profile protected from being smoothed away during that blending step.
- For manual control beyond the automatic profile, click directly on the layer height bar — left-click to thin a specific section further, right-click to thicken it — before applying.
The minimum and maximum layer heights this feature can use are pulled from your printer/extruder settings, so double-check those limits reflect your actual nozzle before relying on the automatic profile.
Limitations to Know Before You Enable It
- Multi-material and multi-color prints: every object on the plate must share the same layer height settings, or the prime tower won’t function correctly. Variable layer height on one object while another uses a different profile isn’t supported in a multi-material setup.
- Organic tree supports: not currently compatible with variable layer height. If your print needs tree supports, plan on uniform layer height for that plate.
- Non-standard transition heights: because the profile is generated automatically, it can occasionally propose a transition height that isn’t a clean multiple of your printer’s Z-axis step size. In practice this rarely causes visible issues, but it’s a known rough edge in how the feature calculates transitions.
Height Range Modifiers: Changing Layer Height Mid-Print
Variable layer height adapts automatically based on geometry, but sometimes you want direct, deliberate control over which sections get which layer height — a detailed face at the top of a model with a plain cylindrical base below it, for example. That’s what a height range modifier does: it lets you assign a specific layer height (and other settings) to an explicit vertical range of the model, rather than the whole thing.
To use one: right-click the object in the object list, add a height range, then set the start and end height for that range and the layer height to apply within it. This is a more surgical tool than variable layer height — you’re choosing the exact boundaries yourself instead of letting the slicer propose them from geometry, which is useful when you know precisely which section needs to change and don’t want the rest of the model touched.
Recommended Settings by Print Goal
Miniatures & fine detail
0.1–0.15mm on a 0.4mm nozzle. Detail resolution matters more than speed here; expect meaningfully longer print times in exchange for crisp facial features and small ornamentation.
Everyday / general prints
0.2mm on a 0.4mm nozzle. The default for a reason — balances surface quality, print time, and reliability across almost any model type.
Functional / mechanical parts
0.2–0.28mm. Don’t chase the finest layer height for strength — wall count and infill matter more, and a coarser layer height often prints just as strong, faster.
Rapid prototyping / draft prints
0.28–0.32mm. Visible layer lines are an acceptable trade for iterating on a design quickly; save fine layer heights for the final version.
Common Layer Height Problems and Fixes
- Fish-scale or scaly surface pattern. Usually caused by a layer height set below roughly 20% of the nozzle diameter, especially combined with high print speed. Raise the layer height back into the recommended range, or slow the print down if you genuinely need the fine layer height for detail.
- Weak layers or visible gaps between them. Often a sign the layer height is pushed above the recommended maximum for the nozzle. Bring it back within the 20–80% range and recheck adhesion.
- Rough, stepped curves on an otherwise fine print. This is the staircase effect — a fixed layer height doesn’t handle curved geometry well no matter how fine it is. Switch to variable layer height instead of just lowering the uniform value further.
- Pillowing on top surfaces. Not strictly a layer height bug, but closely related — at finer layer heights, your top/bottom solid thickness in millimeters divides into more layers than the default top-layer count accounts for. If infill starts showing through the top surface, increase your top shell layer count to match (roughly: target solid thickness in mm ÷ layer height = number of layers needed).
- First layer not sticking. Check that the first layer height is in the recommended range for your nozzle (not just left at whatever the general layer height is set to) and that it isn’t set unusually thin, which reduces its forgiveness for bed-leveling imperfections.
Does a lower layer height always make a print stronger?
No. While some testing shows thinner layers gaining a modest strength edge, other testing shows 0.2–0.3mm layers performing just as well or better, since layer count and interlayer bonding interact in ways that don’t always favor the finest option. Wall count, infill, and material choice generally matter more to strength than layer height alone.
What is the best layer height for a 0.4mm nozzle in Orca Slicer?
0.2mm is the standard, reliable default for a 0.4mm nozzle — it balances surface quality, print time, and adhesion for the vast majority of prints. Drop to 0.12mm for fine-detail work like miniatures, or raise to 0.28mm for faster, less detail-sensitive parts.
What is variable (adaptive) layer height and how do I enable it?
It’s a feature that adjusts layer thickness automatically across the model — thinner on curves and detail, thicker on flat or simple sections — instead of applying one uniform value everywhere. Enable it from the Variable Layer Height tool in the top toolbar, then use the Quality/Speed slider and smoothing radius to fine-tune the profile before applying
Can I change layer height partway through a print in Orca Slicer?
Yes, using a height range modifier. Right-click the object, add a height range, and assign a specific layer height to that vertical section of the model — useful when you want deliberate, exact control rather than the automatic profile variable layer height generates.
What’s the minimum layer height for a 0.4mm nozzle?
Roughly 0.08mm is the practical floor for a 0.4mm nozzle before flow inconsistencies and fish-scale patterning become a real risk, though the useful range for most prints sits well above that, closer to 0.12–0.28mm depending on the goal.