OrcaSlicer Seam Settings Guide: Best Position for Smooth 3D Prints
Every FDM 3D print has a seam — the point where each perimeter loop starts and stops. Because the nozzle has to interrupt continuous motion at that point, it usually leaves a small blob, bump, or line running vertically up the side of the print. On a functional part this is a minor cosmetic flaw. On a display model, a miniature, or anything with a smooth curved surface, it can be the first thing anyone notices.
Orca Slicer gives you more control over this than most slicers — five seam position modes, a scarf seam feature that blends the seam into the surrounding wall instead of stacking it, and a manual painting tool for exact placement. Used correctly, seam settings alone can take a print from “clearly 3D printed” to “hard to tell how this was made.” This guide walks through every option and what to actually set them to — part of our full Orca Slicer settings wiki if you want to work through other quality settings too.
What Are Seam Settings in Orca Slicer
Seam controls live under Process Settings → Quality → Seam. This section decides three things: where on each layer the seam is placed, whether it’s a sharp stop-start point or a blended scarf transition, and — if you use the painting tool — exactly which points on the model it should land on.
[Screenshot: Process Settings panel showing the Quality tab expanded to the Seam section, with Seam Position, Staggered Inner Seams, and Scarf Seam options visible]
These settings apply per-object, so you can mix approaches — for example, a clean Scarf Seam on a vase and Aligned on a mechanical bracket in the same plate. If you’re still getting familiar with where things live in the interface, our Orca Slicer interface guide covers the full panel layout.
What are the Different Seam Position Options?
These below are all the possible positions of seam in Orca Slicer.. This is the single biggest upgrade for cosmetic prints in recent Orca Slicer versions, and it’s worth enabling by default on anything visible.
Seam Position Options — Orca Slicer
Seam Position Options Explained
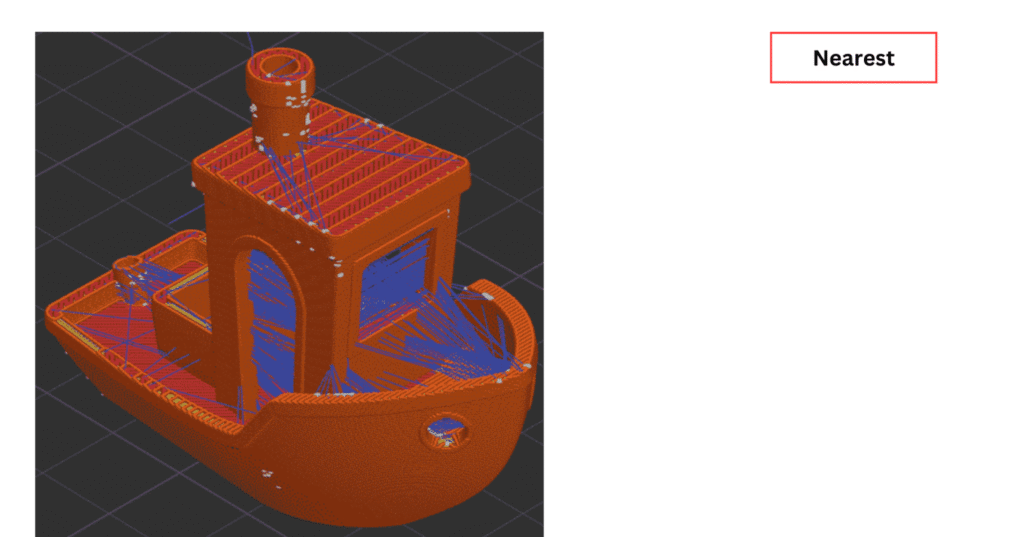
Nearest
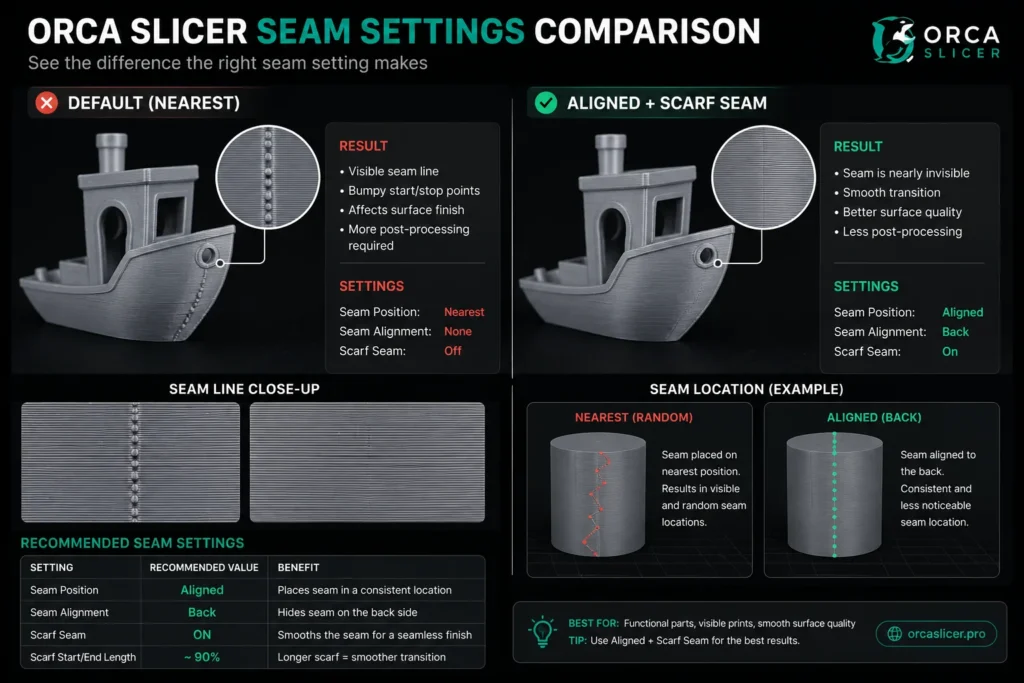
Places the seam at whichever point on the perimeter is closest to the end of the previous travel move. It’s the default in many slicers because it minimizes travel time, but it also means the seam position can jump around unpredictably layer to layer, which shows up as a rough, scattered line rather than a clean one. Good for prototypes where seam appearance doesn’t matter and you want slightly faster prints.
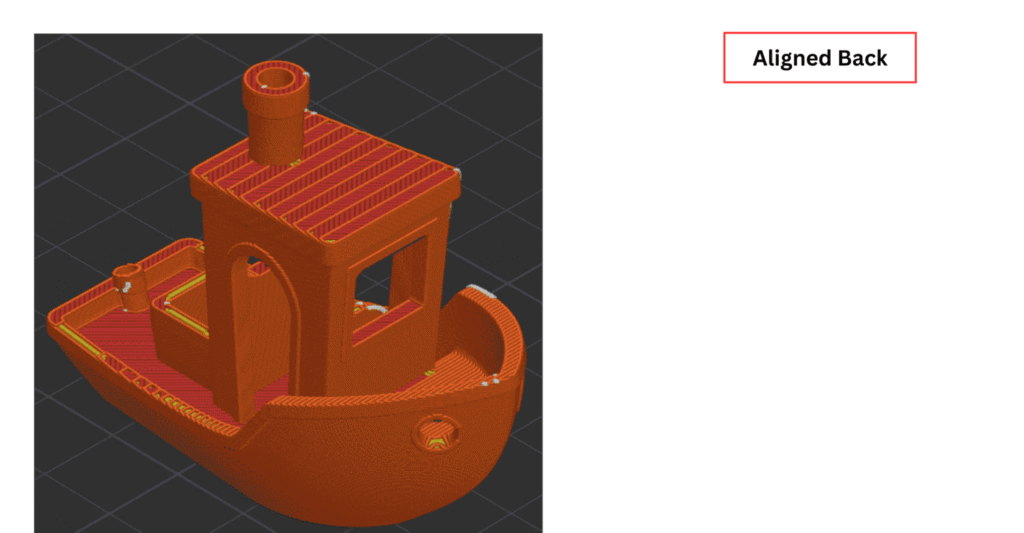
Aligned
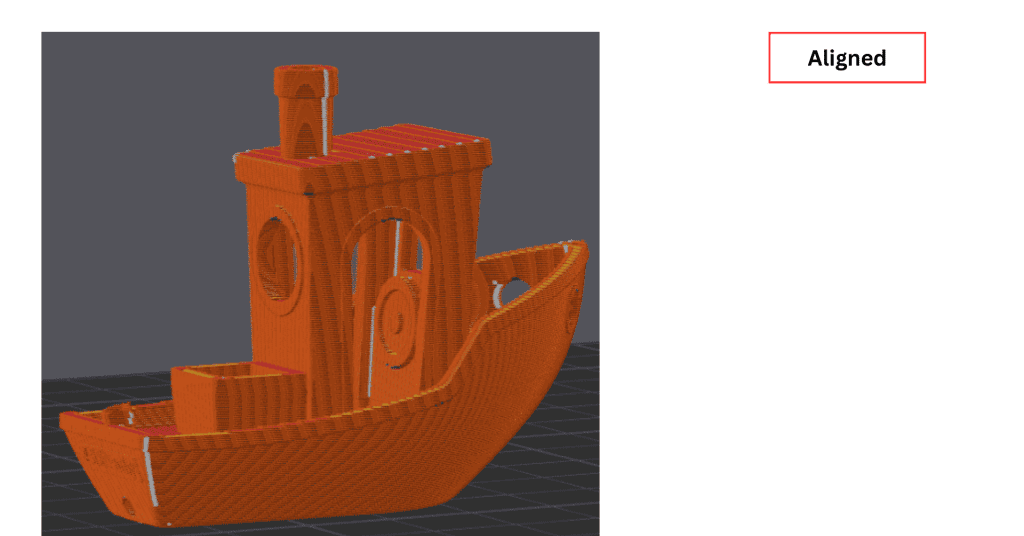
Stacks the seam at the same X/Y location on every layer, choosing a position based on the model’s geometry (favoring convex corners where a seam is less visible). This is the most commonly recommended setting for general-purpose printing — it trades a small amount of travel efficiency for a seam that reads as one straight, predictable line instead of a scattered mess.
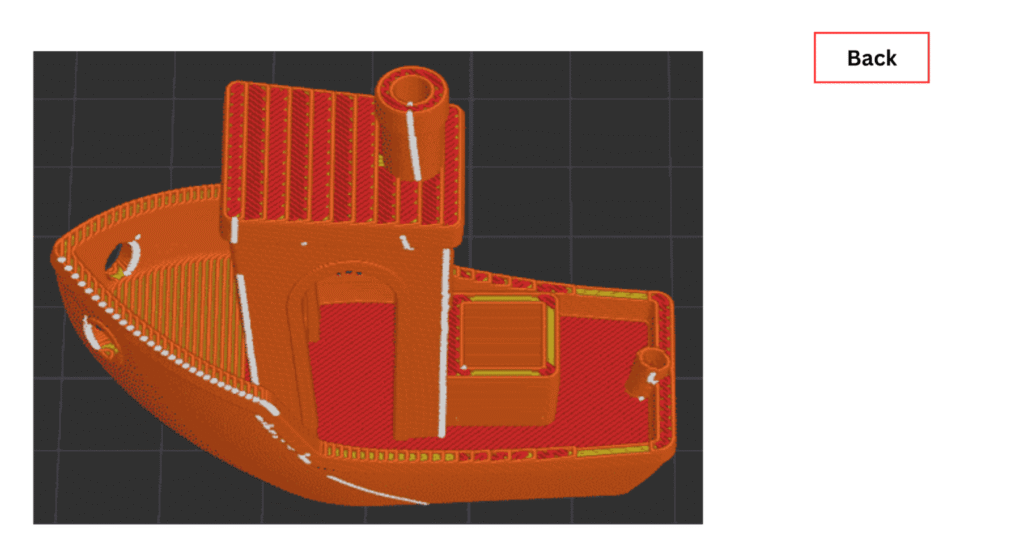
Back
Forces the seam to the point on the perimeter closest to the back of the model (relative to the build plate orientation). Useful when you know exactly how the model will be viewed or displayed and want to guarantee the seam faces away from the viewer — figurines on a shelf, phone stands, anything with an obvious “front.”
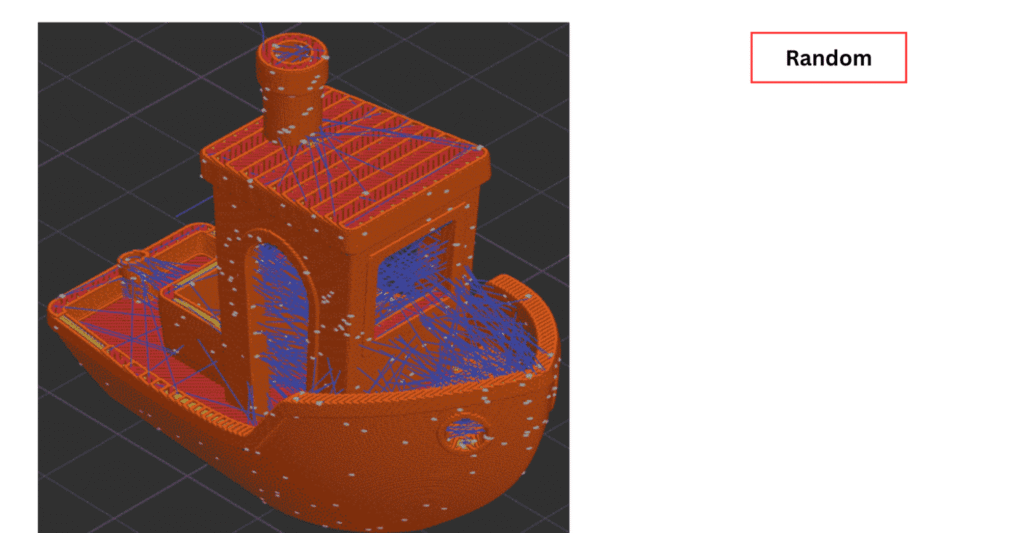
Random
Scatters the seam to a different location on every layer, so no single vertical line ever forms. Instead of one visible seam, you get faint texture spread across the whole surface. This works well on organic, textured models where a single hard line would look worse than a bit of overall surface noise — but it’s a poor choice for smooth-walled prints, where it just creates all-over roughness instead of solving the problem.
Sharp tail
Biases the seam toward sharp corners or points on the model rather than smooth curves, on the logic that a seam hidden in an existing sharp edge is far less noticeable than one on a flat or curved surface. Best suited to models that actually have sharp geometric features to hide it in — less useful on rounded or organic shapes with no natural edge to exploit.
Scarf seam
Changes what happens at the seam itself, independent of where it’s positioned. Instead of the nozzle stopping and starting abruptly (which creates a small step or blob), it ramps the seam in and out at an angle — like a scarf joint in woodworking — so the start and end of the loop blend smoothly into the surrounding wall instead of stacking on top of it. This is the single biggest upgrade for cosmetic prints in recent Orca Slicer versions, and it’s worth enabling by default on anything visible.
Seam Position Options Explained
Nearest
Places the seam at whichever point on the perimeter is closest to the end of the previous travel move. It’s the default in many slicers because it minimizes travel time, but it also means the seam position can jump around unpredictably layer to layer, which shows up as a rough, scattered line rather than a clean one. Good for prototypes where seam appearance doesn’t matter and you want slightly faster prints.
Aligned
Stacks the seam at the same X/Y location on every layer, choosing a position based on the model’s geometry (favoring convex corners where a seam is less visible). This is the most commonly recommended setting for general-purpose printing — it trades a small amount of travel efficiency for a seam that reads as one straight, predictable line instead of a scattered mess.
Back
Forces the seam to the point on the perimeter closest to the back of the model (relative to the build plate orientation). Useful when you know exactly how the model will be viewed or displayed and want to guarantee the seam faces away from the viewer — figurines on a shelf, phone stands, anything with an obvious “front.”
Random
Scatters the seam to a different location on every layer, so no single vertical line ever forms. Instead of one visible seam, you get faint texture spread across the whole surface. This works well on organic, textured models where a single hard line would look worse than a bit of overall surface noise — but it’s a poor choice for smooth-walled prints, where it just creates all-over roughness instead of solving the problem.
Sharp tail
Biases the seam toward sharp corners or points on the model rather than smooth curves, on the logic that a seam hidden in an existing sharp edge is far less noticeable than one on a flat or curved surface. Best suited to models that actually have sharp geometric features to hide it in — less useful on rounded or organic shapes with no natural edge to exploit.
Scarf seam
Changes what happens at the seam itself, independent of where it’s positioned. Instead of the nozzle stopping and starting abruptly (which creates a small step or blob), it ramps the seam in and out at an angle — like a scarf joint in woodworking — so the start and end of the loop blend smoothly into the surrounding wall instead of stacking on top of it. This is the single biggest upgrade for cosmetic prints in recent Orca Slicer versions, and it’s worth enabling by default on anything visible.
What are the Recommended starting Seam settings
Recommended Starting Settings
| Setting | Recommended value | Notes |
|---|---|---|
| Scarf seam start height | 0% | Starts the ramp from the base of the layer for the smoothest blend |
| Scarf seam start angle | Auto or ~30–45° | Auto works for most geometry; manual angle helps on very small perimeters |
| Scarf around entire wall | Enabled | Wraps the effect around the full loop, not just near the seam point |
Manual Seam Painting
When automatic positioning doesn’t put the seam where you want it, Orca Slicer lets you paint the exact location by hand.
- Select the object in the 3D view.
- Switch to the Seam Painting tool in the left toolbar (paintbrush icon with a seam symbol).
- Adjust brush size using the slider or
[/]keys. - Left-click and drag across the surface where you want the seam to be forced.
- Right-click and drag to erase painted areas if you need to correct a mistake.
- Slice and preview — the seam should now follow your painted line instead of the automatic algorithm.
This is most useful for models with an obvious hidden spot (an inside corner, a joint line, the underside of a base) that the automatic modes don’t reliably find on their own.
Recommended Settings by Print Type
| Print type | Seam position | Scarf seam | Notes |
|---|---|---|---|
| Visible / cosmetic prints | Aligned or Back | Enabled | Combine with painting for full control on hero pieces |
| Functional / mechanical parts | Nearest or Aligned | Optional | Prioritize print speed and strength over cosmetics |
| Miniatures | Sharp Tail or manual painting | Enabled | Small perimeters benefit from precise, hand-placed seams |
Common Mistakes
- Seam position not matching model orientation. Back-facing seam settings are calculated relative to the plate, not the model’s “front” — if you rotate the model after setting this, re-check where the seam lands.
- Expecting Scarf Seam to fix a bad seam position. Scarf smooths the transition, but it doesn’t hide a poorly positioned seam — position and scarf need to be set together, not as substitutes for each other.
- Scarf seam not visibly working on small perimeters. On very small loops (miniature details, thin walls), the scarf ramp may not have enough perimeter length to complete before looping back — try a smaller scarf angle or disable it on those specific features.
- Ignoring seam settings entirely and blaming the material. A rough or bulging vertical line is very often a seam issue, not a filament or temperature problem — check seam settings before adjusting values in your filament settings (or your PETG profile if that’s what you’re running) or retraction.
Scarf Joint Seam
What Is Scarf Joint Seam?
The term “scarf joint” comes from woodworking, where two pieces are cut at matching angles and overlapped rather than butted end to end — the angled overlap spreads the join across a length instead of concentrating it at one point, so it’s far less visible and structurally weaker at that single spot. Orca Slicer borrows the same idea for 3D printing: instead of a wall loop stopping and starting abruptly, the print head ramps the flow up and down across an angled overlap, spreading the seam transition along a short stretch of the wall instead of stacking it in one place.
Scarf Joint Seam: Types and Advanced Parameters
In practice, this changes both how the seam looks and how it holds up mechanically. A standard seam is a single vertical fault line where the nozzle briefly interrupts flow; a scarf joint turns that same point into a gradual, angled handoff, so there’s less of a visible ridge and the wall stays continuous rather than stopping and restarting at one spot.
Where it helps most: curved and rounded surfaces, where a standard seam reads as an obvious straight interruption against the curve.
Contour vs. Contour and Hole
Orca Slicer applies the scarf effect through two separate options, and it’s worth knowing which one you’re turning on:
- Contour applies the scarf ramp to the outer perimeter of the model — the visible outside wall. This is the one most people mean when they say “scarf seam.”
- Contour and hole extends the same treatment to internal perimeters as well — the walls around holes and cavities inside the model. Turn this on for parts where an internal bore or cutout is just as visible as the outside (a lamp shade, a vase with a cut-out pattern), and leave it off for parts where internal walls are hidden anyway.
Conditional Scarf Joint
Rather than forcing scarf blending onto every wall regardless of shape, Orca Slicer can apply it selectively based on the model’s geometry: straight edges and sharp corners keep a standard seam (where scarfing offers little benefit and can even look worse), while curved sections automatically switch to the scarf treatment. This conditional behavior is generally the better default for mixed-geometry prints — sharp mechanical parts with a few curved surfaces, for instance — since it avoids wasting the extra print time on segments where scarfing wouldn’t be visible anyway.
Advanced Parameters
Beyond the starting height and angle covered above, a few more parameters shape how the scarf joint actually prints:
| Parameter | What it controls | Starting point |
|---|---|---|
| Scarf joint speed | Print speed through the ramped section | Keep it under 100 mm/s; Orca Slicer will automatically cap it to match your inner/outer wall speed if you set it too high |
| Scarf length | How far along the wall the ramp stretches horizontally | Longer lengths blend more gradually but take slightly more time; start with the slicer default and lengthen it for large, highly visible curves |
| Scarf steps | How many small segments make up the ramp | 10 segments (the default) is a reasonable balance; raising it smooths the transition further at a small cost to slicing time |
| Scarf joint flow ratio | Extrusion rate through the scarf section | 100% is the safe starting point — dropping it risks under-extrusion and a weaker, gappier seam |
| Scarf for inner walls | Whether the ramp effect also applies to internal wall loops | Enable only if hidden internal walls double as a visible surface elsewhere in the part |
Trade-offs to Weigh
Scarf joints aren’t free — they trade a bit of print time for a cleaner, and often physically stronger, seam:
- The overlapping transition spreads stress across a longer section of wall instead of concentrating it at one point, which can make the joint mechanically stronger, not just better looking.
- Ramping the flow up and down does add a small amount of extra motion per layer, so expect a modest increase in total print time versus a standard seam.
- Scarf joints add little to no benefit on sharp corners or overhanging sections — this is exactly why the conditional mode exists, so you aren’t paying the time cost on geometry where it wouldn’t show anyway.
A closely related setting worth knowing about while you’re in this part of the settings panel is wipe on loop, which nudges the nozzle slightly inward at the end of a completed loop. It isn’t a scarf setting itself, but it works toward the same goal — reducing stringing and tidying up the exact point where a seam closes — so it’s a natural next stop after you’ve dialed in your scarf joint values.
Manual Seam Painting
When automatic positioning doesn’t put the seam where you want it, Orca Slicer lets you paint the exact location by hand.
- Select the object in the 3D view.
- Switch to the Seam Painting tool in the left toolbar (paintbrush icon with a seam symbol).
- Adjust brush size using the slider or
[/]keys. - Left-click and drag across the surface where you want the seam to be forced.
- Right-click and drag to erase painted areas if you need to correct a mistake.
- Slice and preview — the seam should now follow your painted line instead of the automatic algorithm.
This is most useful for models with an obvious hidden spot (an inside corner, a joint line, the underside of a base) that the automatic modes don’t reliably find on their own.
Recommended Settings by Print Type
| Print type | Seam position | Scarf seam | Notes |
|---|---|---|---|
| Visible / cosmetic prints | Aligned or Back | Enabled | Combine with painting for full control on hero pieces |
| Functional / mechanical parts | Nearest or Aligned | Optional | Prioritize print speed and strength over cosmetics |
| Miniatures | Sharp Tail or manual painting | Enabled | Small perimeters benefit from precise, hand-placed seams |
Common Mistakes
- Seam position not matching model orientation. Back-facing seam settings are calculated relative to the plate, not the model’s “front” — if you rotate the model after setting this, re-check where the seam lands.
- Expecting Scarf Seam to fix a bad seam position. Scarf smooths the transition, but it doesn’t hide a poorly positioned seam — position and scarf need to be set together, not as substitutes for each other.
- Scarf seam not visibly working on small perimeters. On very small loops (miniature details, thin walls), the scarf ramp may not have enough perimeter length to complete before looping back — try a smaller scarf angle or disable it on those specific features.
- Ignoring seam settings entirely and blaming the material. A rough or bulging vertical line is very often a seam issue, not a filament or temperature problem — check seam settings before adjusting values in your filament settings (or your PETG profile if that’s what you’re running) or retraction.
Frequently Asked Questions About Seam Setting
What is the best seam setting for smooth prints?
For most cosmetic prints, Aligned seam position combined with Scarf Seam enabled gives the smoothest, most predictable result. For models with an obvious hidden spot, manual seam painting combined with Scarf Seam gives the cleanest outcome of all.
Why is my seam still visible?
Check three things in order: seam position (Nearest scatters unpredictably — switch to Aligned), whether Scarf Seam is enabled, and whether your filament settings — particularly flow rate and pressure advance — are calibrated for the material, since over-extrusion at the seam point exaggerates any bump regardless of seam settings.
Does scarf seam slow down printing?
Slightly. Because the nozzle ramps in and out gradually instead of stopping abruptly, scarf seams add a small amount of extra motion per layer. On most prints this adds only a few minutes to total print time — a worthwhile trade for cosmetic quality on visible parts.