Orca Slicer Z Offset: How to Set and Calibrate It
Orca Slicer Z offset is a printer setting that adds a fixed amount to every Z coordinate in the G-code. You find it under Printer settings > Basic information > Printable space > Z offset. A negative value moves the nozzle closer to the bed, and a positive value lifts it. Most printers should keep the main offset in firmware and use this field only for small, slicer-side corrections.
This guide shows where the setting lives, which way the sign goes, how it differs from the offset on your printer, how to calibrate it with a one-layer test, and how to set a different offset for each filament.
Where is the Z offset setting in Orca Slicer?
The Z offset field sits in the printer preset, not the process or filament preset. Orca hides it in the simple view, so turn on Advanced mode first.
- Click the Advanced toggle at the top of the settings sidebar.
- Click the edit icon next to your printer to open Printer settings.
- Open Basic information and find the Printable space group.
- Type a value in Z offset, in millimetres. The default is 0.
- Save the preset under a new name. Orca does not let you overwrite a system preset.
Orca applies the value when it writes the G-code, so you need to slice again after every change.
Is the Z offset positive or negative?
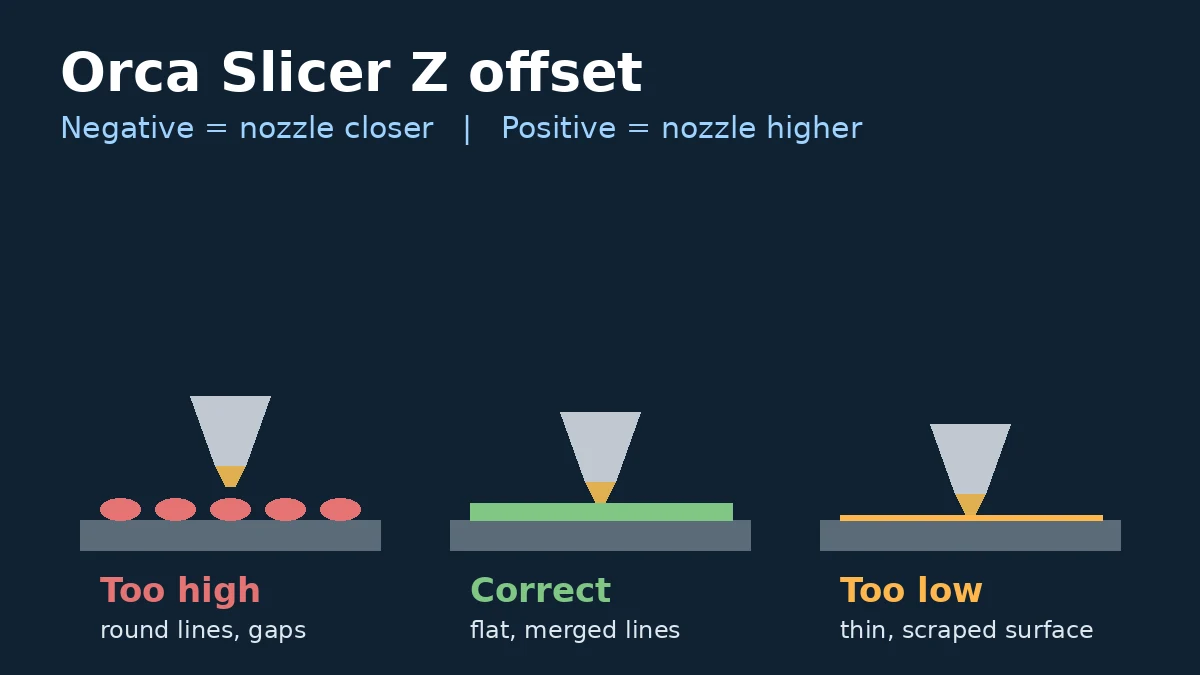
Orca adds the value to every Z move. A negative number lowers the nozzle, which gives more squish. A positive number raises the nozzle, which gives less squish. The official tooltip gives an example: if your endstop leaves the nozzle 0.3 mm above the bed, set the offset to -0.3.
| What you see on the first layer | What it means | What to change |
|---|---|---|
| Round lines with gaps, corners lift, lines peel off | Nozzle sits too high | Lower the offset by 0.02 mm (for example 0 to -0.02) |
| Flat lines that merge into one smooth sheet | Correct gap | Keep the value and save the preset |
| Thin, see-through areas, ridges, scraping sounds or a bulging base | Nozzle sits too low | Raise the offset by 0.02 mm (for example -0.04 to -0.02) |
A nozzle that sits too low also causes a flared bottom edge. Our guide to elephant foot compensation explains how to trim that edge once the gap is right.
Printer Z offset vs slicer Z offset: which one should you use?
Use the printer for the main value and Orca for fine-tuning. Three places can hold a Z offset, and they stack on top of each other:
- Firmware offset. Marlin stores the probe offset with
M851 Z, and Klipper stores it as the probez_offsetin printer.cfg. This value follows the printer no matter which slicer you use. - Live adjustment. Babystepping on Marlin (
M290) orSET_GCODE_OFFSET Z_ADJUSTon Klipper changes the gap while the first layer prints. Klipper users can then runZ_OFFSET_APPLY_PROBEandSAVE_CONFIGto keep the new value. - Orca Slicer Z offset. Orca shifts the coordinates in the file itself. Pick it when you cannot reach the printer menu, or when you want one preset per build plate.
Bambu Lab printers measure the nozzle height on their own before each print, so leave Orca’s field at 0 on those machines. If you switch between a smooth PEI plate and a textured plate, a separate printer preset with its own small offset works well alongside the multiple bed types settings.
How do you calibrate Z offset in Orca Slicer?
Orca’s Calibration menu has no dedicated Z offset test, so use a single-layer square. It takes about five minutes per try and shows the gap clearly.
- Level the bed. Level the bed or run your printer’s probe, and turn on adaptive bed mesh if your printer supports it. A Z offset cannot fix a tilted or warped bed.
- Heat to print temperature. Heat the nozzle and bed to the temperatures of the filament you plan to test. Metal parts expand when hot, so a cold check gives a different gap.
- Add a one-layer test square. Right-click the plate, choose Add Primitive, then Cube. Scale it to about 60 x 60 mm and set its height to your first layer height, for example 0.2 mm.
- Slice and print. Keep the first layer height and first layer line width at your usual values, slice, and print the square.
- Read the result. Look at the square under a bright light and run a fingertip over it. Compare it with the three cases in the table below.
- Adjust in small steps. Change the offset by 0.02 mm at a time: more negative when the lines look round and separate, more positive when the surface looks thin, rough or scraped. Print the square again.
- Save the preset. When the lines merge into a flat, even sheet, save the printer preset as a user preset so the value stays.
Leave the first layer height alone while you test. A thicker first layer hides a wrong gap, and changing two values at once tells you nothing. Our layer height settings guide covers the first layer height ranges for each nozzle size. When the first layer looks right, move on to flow, pressure advance and temperature with the Orca Slicer calibration guide.
How do you set a Z offset per filament in Orca Slicer?
Orca has no Z offset field in the filament preset, so add a line of G-code instead. PETG often prints better with a little less squish than PLA, which makes this a common request on the Orca subreddit.
- Open Filament settings and click the Advanced tab.
- Find Filament start G-code.
- On Klipper, add
SET_GCODE_OFFSET Z=0.03 MOVE=0, with your own value in place of 0.03. - In Filament end G-code, add
SET_GCODE_OFFSET Z=0 MOVE=0so the next print starts clean.
Use Z= rather than Z_ADJUST= here. Z= sets an absolute value, while Z_ADJUST= adds to the current offset, so it can pile up across prints. On Marlin, a babystep command such as M290 Z0.03 only works when your firmware has babystepping turned on. Our Orca Slicer filament settings page explains the other fields in that tab, and the PETG profile guide lists first layer values for PETG.
Why is my Z offset not working in Orca Slicer?
Check these causes in order:
- You edited a different preset. The value belongs to the printer preset you had open. Select that same preset on the plate before you slice.
- The preset never saved. An unsaved change disappears when you switch presets. Save it as a user preset.
- The firmware resets the gap. Start G-code that loads a stored mesh or probe offset runs after Orca’s setting and can cancel it out. Read your machine start G-code.
- The value is too large. A big negative offset can push early moves below the bed. An old GitHub report shows Z hop moves vanishing on low layers in that case. Keep slicer offsets small and fix large errors in firmware.
- You run a Bambu Lab printer. Its automatic nozzle height check takes priority over small slicer changes.
What is the difference between Z offset and Z hop?
Z offset changes the height of every layer by the same amount. Z hop lifts the nozzle only during travel moves, so it clears the printed part and then drops back down. Our Orca Slicer Z hop guide covers the hop types and heights.
Frequently asked questions
Where do I change Z offset in Orca Slicer?
Turn on Advanced mode, open Printer settings, then Basic information. The Z offset field sits in the Printable space group. Save the printer preset after you change it.
Should Orca Slicer Z offset be positive or negative?
Use a negative value to bring the nozzle closer to the bed and a positive value to lift it. Most corrections fall between -0.1 and 0.1 mm once the firmware offset is close.
Does Orca Slicer have a Z offset calibration test?
No. The Calibration menu covers temperature, flow, pressure advance, retraction and other tests, but not Z offset. Print a one-layer square from Add Primitive and adjust in 0.02 mm steps.
Can I set a different Z offset for each filament?
Yes, with G-code. On Klipper, put SET_GCODE_OFFSET Z=0.03 MOVE=0 in the filament start G-code and reset it to 0 in the filament end G-code.
Does the Orca Slicer Z offset replace the offset on my printer?
No. The two values add together. Keep the main offset in firmware and use the Orca field for small changes, such as a different build plate.
Get a perfect first layer
Dial in the gap once, save the preset, and every print starts on a flat, even first layer. If you have not installed it yet, grab the latest Orca Slicer download for Windows, macOS or Linux, then work through the rest of our calibration steps.